Low FODMAP Baked Alaska
It was time to make a Low FODMAP Baked Alaska, as I love this dessert so very much. I have had a version in many of my cookbooks, even dating back to my very first book, The Wedding Cake Book. That one was a gigantic showstopper! This low FODMAP version is for a holiday or special occasion-sized crowd at home, as it serves 24 people.

If you have never had Baked Alaska, you are in for a treat. It always combines a layer of cake, a thick layer of ice cream and then everything is covered with meringue, which is browned.
It presents a fabulous combo of textures and temperatures and one can play with the flavors of cake and ice cream, tailoring it to your likes. For our purposes we use a low FODMAP gluten-free cake and lactose-free ice cream.
Baked Alaska History
This might be the first low FODMAP Baked Alaska large enough to feed a party, but the dessert itself dates back quite a ways – but the exact provenance cannot be pinpointed.
A dessert called “omelette Norwegge”, or Norwegian Omelet, was constructed of layers of cake and ice cream, covered in browned meringue and most likely dates to the 1830s, although some historians say 1890s. The name was most likely a nod to the cold climate of Norway and regardless of the date of origin, it certainly described what we think of as Baked Alaska.
Jump to 1867, when Alaska was purchased and became our 49th state. At this time, an expat Parisian chef, Charles Ranhofer, was working at Delmonico’s restaurant in New York City. Ranhofer had a way of weaving his creations in with current events and named dishes after famous people of the time, such as his Peach Pudding à la Cleveland, referencing President Grover Cleveland, and his Sarah Potatoes after actress Sarah Bernhardt.

Ranhofer presented a version of “omelette Norwegge” calling it “Alaska, Florida”, taking advantage of the fact that the acquisition of Alaska was a hot-button issue of the day and also a nod to the hot and cold temperature contrasts in the dessert. His original version featured a spiced walnut cake and banana ice cream and cost what would be equivalent to over $40 today. It was exotic, as bananas, at the time, were a pricey Central American fruit.
Delmonico’s is still in business today and offers Baked Alaska for a mere $13. Bananas are cheaper these days! They sell hundreds per day and will most likely never take it off of the menu, as it is one of their most popular items.
What You Need: Equipment
OK this is an odd recipe in that you have to create the holiday tree shape and I suggest that you do that with a bowl and a funnel or two. Look at these images below.

Here you can see a metal bowl, which is 7 ¾-inch (19.5 cm) across from open edge to open edge and 5-inches (12 cm) deep with a 12-cup (2.8 L) volume.I have made this Baked Alaska with just the bowl and the larger funnel, but the addition of the smaller funnel makes an even more “tree” shaped dessert.
The larger funnel is 5-inches (12 cm) across and 3 ½-inches (9 cm) deep, and the smaller funnel is 4 ¼-inches (10.5 cm) across and about 2 ½-inches (6 cm) deep.
Try to get a bowl and funnel(s) of similar proportions. Just get as close as you can. It will all work out because when you apply the Italian meringue, you can truly coax the tree shape out of what you’ve got.
You also need a couple of 12-inch (30.5 cm) long bamboo skewers (you will only use one, but sometimes they break). You can see the skewer inserted into our Baked Alaska below. It is not ready to slather with Italian Meringue!

What You Need: Recipes & Ingredients
This recipe is mostly about assembly. You will be either buying or making several components, several of which are represented elsewhere in this book, and you have to have everything ready to go at certain times. Read the recipe through and make sure you understand the approach.
The Chocolate Cake component is our super simple Easy Chocolate Cake.
For the ice cream, we use lactose-free ice cream. If you haven’t tried Beckon Lactose-Free Ice Cream, we highly recommend it! For the Low FODMAP Baked Alaska pictured we used Beckon Vanilla, Lactaid Mocha Almond Chip and Talenti Raspberry Sorbetto. Pick and choose whatever flavors you would like that blend well together.
Save this article
For my version pictured I used about 1 ½-quarts (1.4 L) of the mocha almond chip, 1-quart (960 ml) of the vanilla and 1 ½-pints (720 ml) of the sorbet.
Do-Ahead Components for Low FODMAP Baked Alaska
Read the recipe through before beginning. There are several steps that require sitting around and waiting (for the ice cream to soften) and also for the cake and ice cream to harden before slathering with meringue.
I prefer to start this a day before serving, but you can pack it into a one-day affair. See Tips for more info.
Burn Baby Burn
By far the easiest way to brown the meringue is to use a torch, either propane or butane. They are very inexpensive and are a fun purchase, if you can swing it. By torching from the outside, you can control the browning and also not expose the ice cream to much heat.
The alternative is to brown the assembled creation in the oven. In this case it is best to have the cake and ice cream frozen overnight to be rock hard. Also make sure you adjust your oven rack properly so that the tall Low FODMAP Baked Alaska can fit without hitting the top of the oven.

Optional Additional Pyrotechnics
If you like drama, if this baby isn’t dramatic enough, you can gild the lily and present it flaming like a volcano. This is actually easily accomplished. When you are cracking the eggs for the meringue, save one, neat half eggshell. Have a couple of tablespoons of high-proof liquid on hand, like vodka, and see optional directions in recipe.
Ignore The Nutrition
The Nutritional panel truly is a mere suggestion here in that your sizes of bowls and funnels and your amounts of ice cream will perhaps vary from what I used. For instance, I suggest that you buy 2-gallons (7.5 L) of ice cream, but you most likely will not need all of it. Ditto for the meringue – you might not use all of it. Consider this Nutritional Info as a guideline.

Let’s make our Low FODMAP Baked Alaska!
Low FODMAP Baked Alaska
Just like the classic, our Low FODMAP Baked Alaska is comprised of cake, ice cream and browned meringue, but ours is LOFO, GF and LF! This one is a SHOWSTOPPER!
Ingredients:
- 2- gallons (7.5 L) lactose-free ice cream, your choice of flavor(s)
- Half a batch of Easy Low FODMAP Chocolate Cake, baked in an 8-inch (20 cm) round pan, cooled and split horizontally
- 1 batch Italian Meringue Buttercream, made WITHOUT adding the butter
- 1 cup (240 ml) Dark Chocolate Ganache, warmed, thinned if needed with a little lactose-free milk or cream to be quite pourable
Preparation:
-
One Day Before: The day before you plan to serve the dessert, or up to 3 days ahead, line the bowl and the funnel(s) with plastic wrap. Use as few pieces as possible to get the job done, but as many pieces as is necessary to completely line the “molds”; allow extra plastic wrap to overhang; set aside.
-
Transfer your ice cream to the refrigerator for about 30 minutes before working with it to soften. You want to soften it “just” enough to work with, but not allow it to melt.
-
Now you are going to pack your ice cream into the molds. Pack it in there in whatever way you like, either keeping each mold one flavor, or you can make layers of different flavored ice cream, within each mold.
-
For the bowl I began with packing 1-quart (960 ml) of ice cream into the rounded bottom of the bowl, then I took one layer of cake, cut it to fit, and pressed it on top of the ice cream. Then I packed the bowl with more ice cream, almost to the top, pressed the remaining cake layer on top bringing everything to the rim, and then wrapped it well with plastic wrap. Pack the funnel(s) with ice cream too, all the way to the rim, cover with plastic wrap and freeze all of them at least overnight.
-
Early The Day Of: Make sure you have room in your freezer for the assembled dessert. Working quickly, unmold your ice cream shapes. Simply lift excess plastic wrap up and out of the molds to facilitate. It the ice cream is really resisting, you can wrap a hot cloth around the outside of the molds briefly.
-
Center the cake bottom of your bowl shaped ice cream, flat side down, on a freezer-safe and heatproof serving platter. Place larger funnel on top of that, flat side down and then the smaller funnel on the very top in a similar fashion, if using. If they are sliding around a little bit, just wait a moment, allow the ice cream to soften and press firmly to help them all settle into place. Take your bamboo skewer and press it straight down from the top. This will take some elbow grease. Keep pressing until the skewer goes through all the ice cream and at least some of the cake. This will keep the layers connected and centered. Leave some skewer sticking out of the top for now. Wrap the whole shebang with plastic wrap and chill for at least 4 hours. (See Tips for another approach if you don’t have the freezer space).
-
Right Before Serving: First of all, if you are going to need the oven, then arrange the oven rack in the lower third of the oven and preheat the oven to 450°F (230°C). If you are going to use your torch, have that ready to go.
-
Make the Italian Meringue: Follow the instructions for our Italian Meringue Buttercream but DO NOT add the butter. Simply make the meringue through beating till cool after adding the hot sugar syrup.
-
For Assembly: Remove your cake/ice cream “tree” from freezer. Use an icing spatula or the back of a large spoon apply the meringue so that it covers every part completely. Bring the meringue all the way down to connect the cake and platter. Make nice whorls and swirls as seen in the images.
-
If you are going to make this into a flaming volcano, nestle an upturned eggshell half in the very top of the “tree”.
-
Now, if you are using the oven, place platter on a sheet pan and place the Baked Alaska in oven for about 5 minutes or just until browned.
-
Alternatively, use your torch to brown the meringue, waving it back and forth over the meringue. You will see very quickly how close (or far) you need to be to get the results you want. I like my meringue nice and toasty. I left it a little light for the images, but simply toast to your desired “doneness”.
-
If you are going to flame the dessert, pour a little bit of vodka into the eggshell and carefully ignite. I tried to get a pic of the flame and failed! It just didn’t show up!
-
Serve immediately with warm chocolate sauce. There is no getting around the fact that this will be a bit messy to serve and the way it looks on the plate. I promise, you, no one will complain. They will all be drooling in anticipation and jockeying for first in line - and then seconds (as digestion allows). Just cut into it with a large, sharp knife and have a cake server/spatula nearby to help.
Notes:
Tips
- If you do not have a lot of freezer space, you can make the meringue, which can hold for a bit. Then unwrap your frozen shapes, assemble them, skewer them, cover them with meringue, brown and serve immediately.
- For Same Day Assembly and Serving: You can also pack the molds the day you are serving the dessert. Do so very early in the day, let them freeze all day, then assemble the cake and ice cream late afternoon/early evening and freeze for a couple of hours before applying meringue, browning and serving.
- You can also freeze the baked Alaska after the meringue has been applied and freeze overnight. I do not like to do this for two main reasons: 1) you need a lot of freezer room so that nothing touches it and 2) you cannot wrap it up, which means that it can pick up weird, errant freezer smells. But if you want to, you can. Then brown the meringue right before serving.
Nutrition
All nutritional information is based on third-party calculations and should be considered estimates. Actual nutritional content will vary with brands used, measuring methods, portion sizes and more. For a more detailed explanation, please read our article Understanding The Nutrition Panel Within Our Recipes.
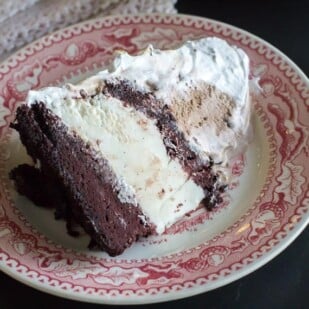
Here you can see the whole Baked Alaska bisected, to show you the finished layers.

Looking for a special cake for a special day? Check out our article, 15 Low FODMAP & Gluten-Free Birthday Cakes & Celebratory Treats.