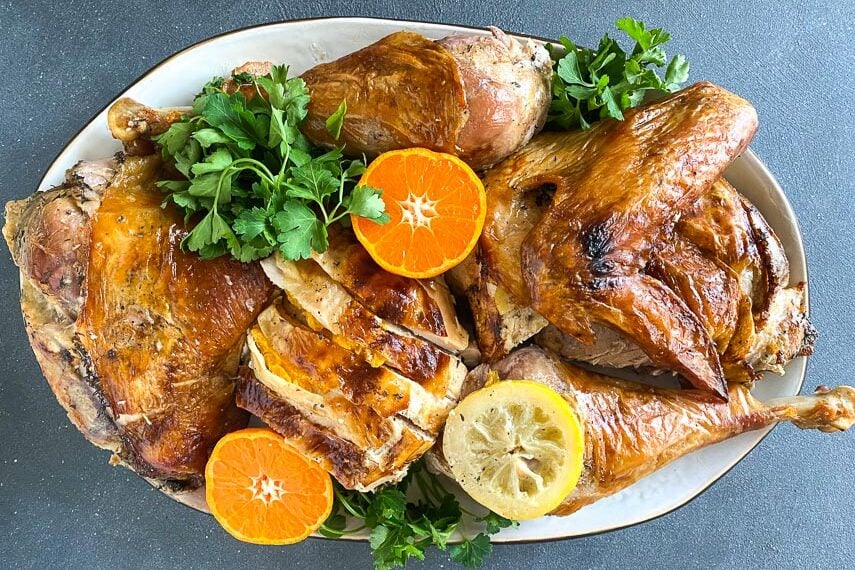
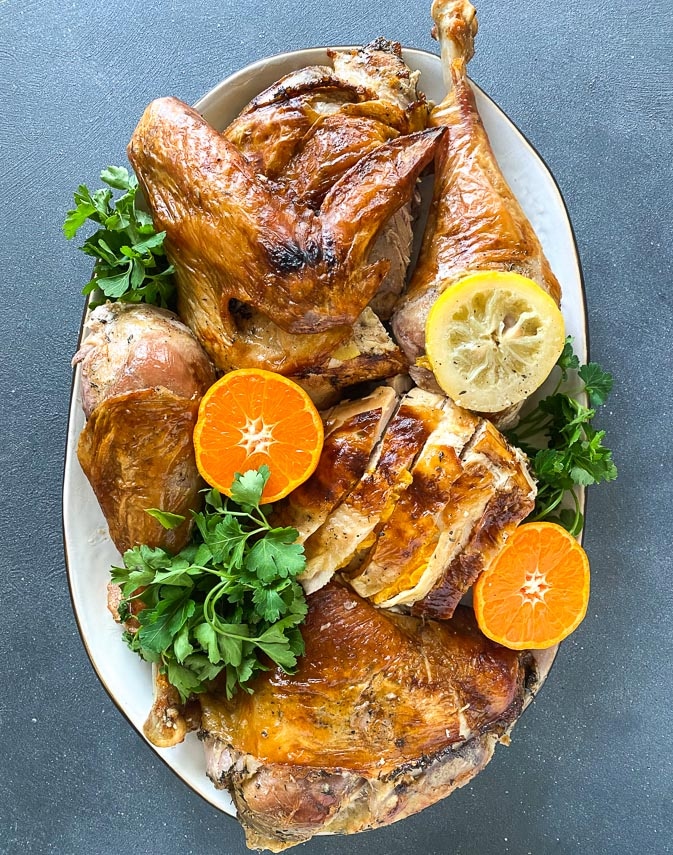
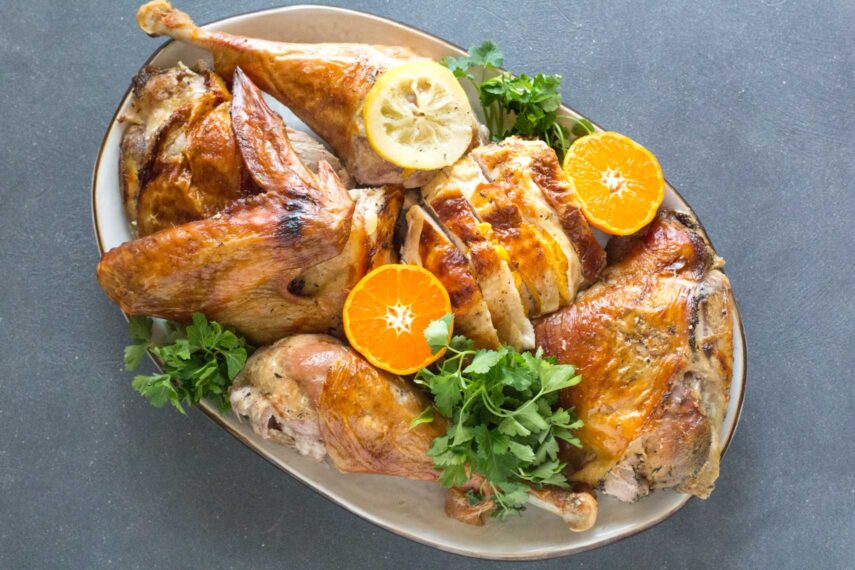
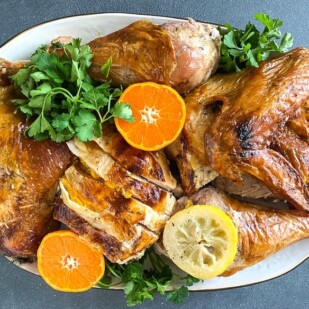
Our Spatchcocked Low FODMAP Citrus Brined Turkey with Giblet Gravy might just be the quickest to roast, crispiest skinned, juiciest fleshed turkey you have ever made or tasted. Spatchcocking allows a turkey to roast “flat” on the pan, creating an even roasting environment so that your turkey is never dry, and the skin is always crisp. The Giblet gravy offers you an option: smooth (giblets cooked in stock only) or chunk (cooked giblets chopped up in gravy).
Let’s Talk Brining
Let’s dive into the two unusual aspects of this recipe: the brining and the spatchcocking. And then we will talk about the giblets, too.
What Does Brining Do?
When you think of brine you probably think about some sort of salty liquid, and indeed, that is what we are going to make and submerge our turkey within.
Brining turkey is a way of adding extra moisture, which does yield a juicier bird after roasting. The turkey will absorb salt from the brine as well, so it gets seasoned from the inside out. The salt also goes to work on the turkey’s proteins, creating more tender flesh. The salt causes protein strands to change shape. The term used is “denatured” and the protein stands literally become unwound.
By the way, this is the same process that occurs when proteins are exposed to acidity, such as when making ceviche, or when exposed to alcohol, such as in some gravlax recipes.
What Kind Of Turkey Is Best To Brine?
First and foremost, do not brine a turkey that has been pre-salted, such as kosher turkey, or any kind of pre-seasoned turkey. You also do not want any kind of turkey that has been injected with any kind of flavorings or liquid, like Butterball brand (regardless of what their website says).
What you do want is a nice fresh, plump turkey, or a defrosted frozen turkey. For a complete guide to buying turkeys, please see our Turkey 101 article. In that article you will learn:
- Pros and cons of fresh vs. frozen.
- How to defrost safely.
- Definitions of “organic”, “natural”, “free-range”, etc.
- Differences among kosher turkeys, self-basting, heritage, etc.
- How to calculate the right size turkey for your guests.
- Turkey 101 FAQs.
How Long Do You Brine The Turkey?
This recipe calls for an overnight brining. Making the brine and sealing it up in the brining bag with the turkey takes mere minutes. Then the turkey should brine overnight. Remove the turkey from the brine and let it come to room temperature before roasting.
Where Do You Store The Turkey During Brining?
This is a very good question, with a multitude of answers. The fridge is the best place, but not everyone has room in their refrigerator to hold the bird. You definitely have to think this through before starting.
I have a second fridge, but when I did not, I got creative. Maybe you are having the neighbors or local family members over for the feast. Maybe you can use their fridge? Or, if the temperature cooperates and it is cool enough, you can use a garage or screened-in porch. Only use these places if the temperature will remain between 34°F and 42°F (1.1°C to 5.5°C). And make sure no critters can get at your precious turkey. Don’t ask.
Let’s Talk About Turkey Size
This recipe uses a large 20-pound (9 kg) bird. This was for a few reasons. First of all, it was the very beginning of the pandemic in spring 2020 and I figured, I better cook something big so that we have food! It was at that time that shelves were going bare.
But I also made a large bird because I knew I was going to spatchcock it, which would help it cook evenly, plus, splitting it into two pieces meant that home cooks (you!) wouldn’t need some outsized roasting pan.
And of course, I went big because then I would have leftovers for curries, turkey salad (like chicken salad), soups, enchiladas, tacos, pot pies, shepherd’s pies – you get the idea. In other words, no downside.
If you want to make a different sized bird, simply follow the directions, still checking initially at 1 hour and use the time, internal temperatures and visual cues for doneness.
What Size Roasting Pan Do I Need?
I like to use sturdy, commercial grade half-sheet pans (which are rimmed) for this recipe. If you have a smaller bird, you might only need one pan. Larger birds need two and will take up two racks in the oven.
Let’s Talk Spatchcocking
Spatchcocking is the other main technique here that you might not be familiar with. Let’s dive in.
How To Spatchcock A Turkey
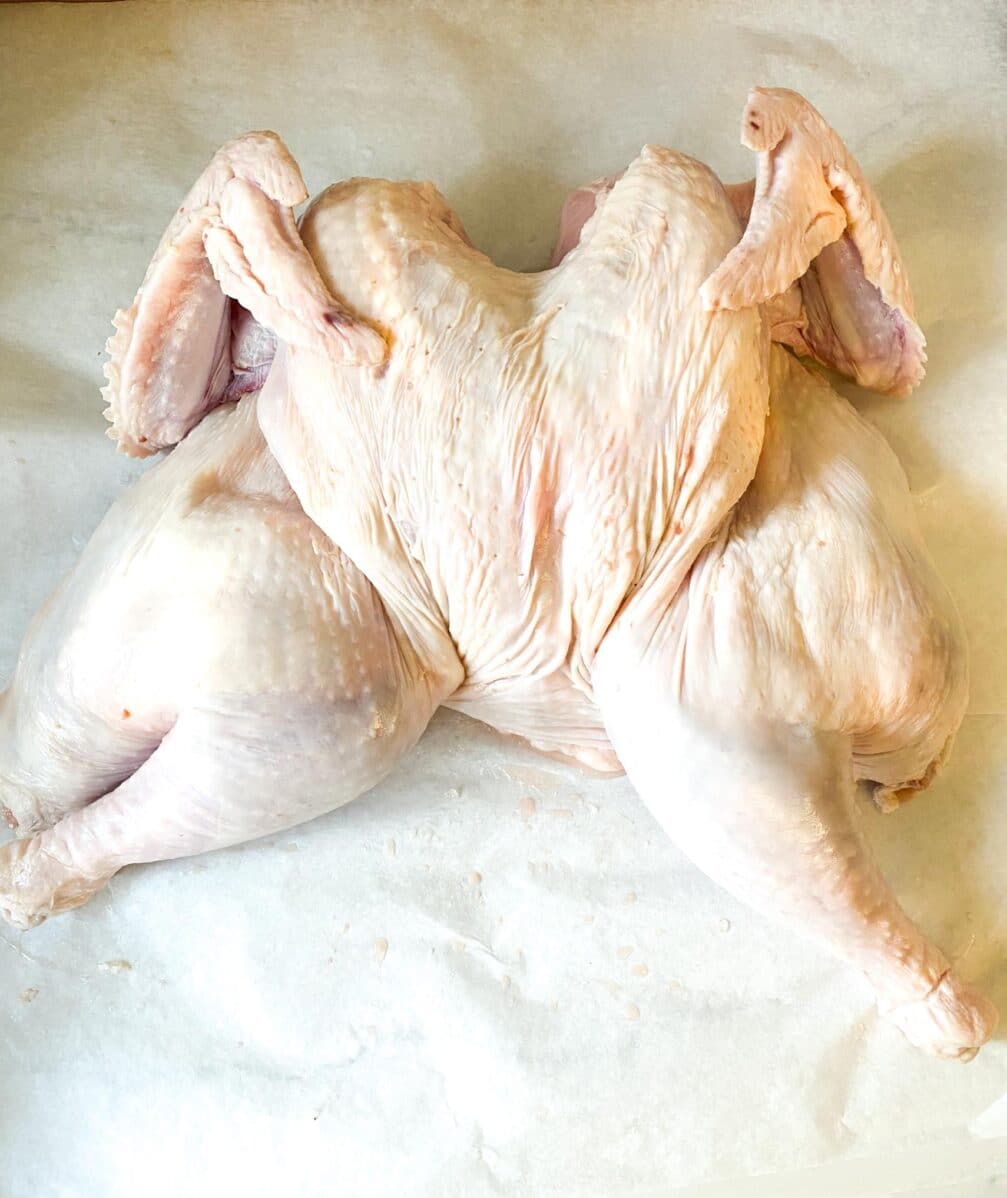
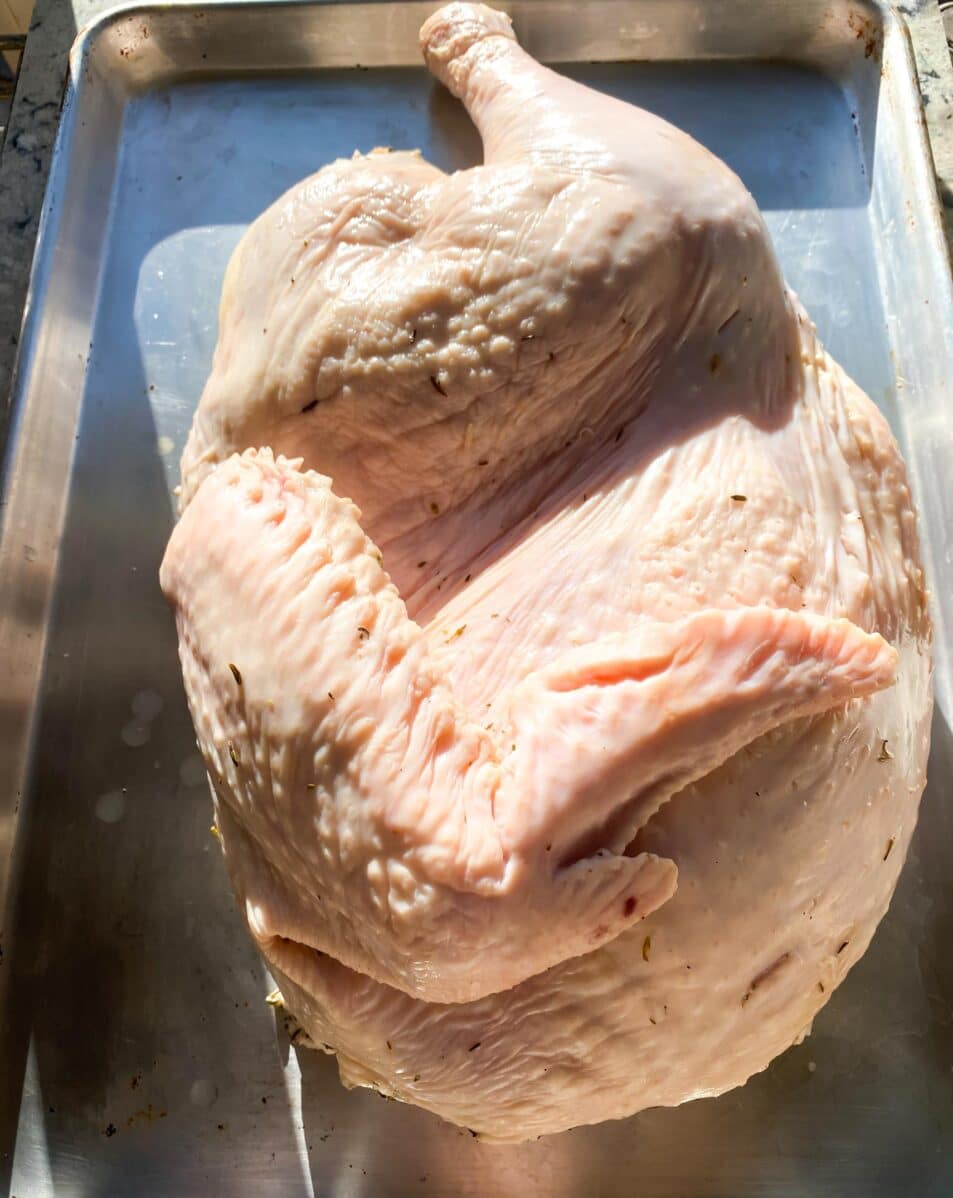
Spatchcocking is a technique where you remove the backbone from a chicken or turkey (or duck or goose for that matter), flatten out the whole shebang and press down on the breastbone to crack it, allowing the bird to lay flat.
We have a video for you that shows you how. The video features a chicken, but all the same moves apply. You could also ask a butcher to do it for you.
Why Spatchcock The Turkey?
Removing the backbone makes it easy to flatten the turkey into a single plane, which promotes more even cooking. You know how people complain that turkey is so lean and prone to be dry? Our spatchcock approach allows the white and dark meat to reach their optimal cooked temperatures at more or less the same time.
Removing the backbone also allows you to use it for gravy while the turkey roasts.
Also, since the spatchcocked turkey skin is all face up in the pan, you have a better chance at getting it to evenly crisp up. More crisp skin means more deliciousness.
I usually sacrifice a full-sized piece of parchment paper to work on; then I just throw it out when I am done working with the raw poultry.
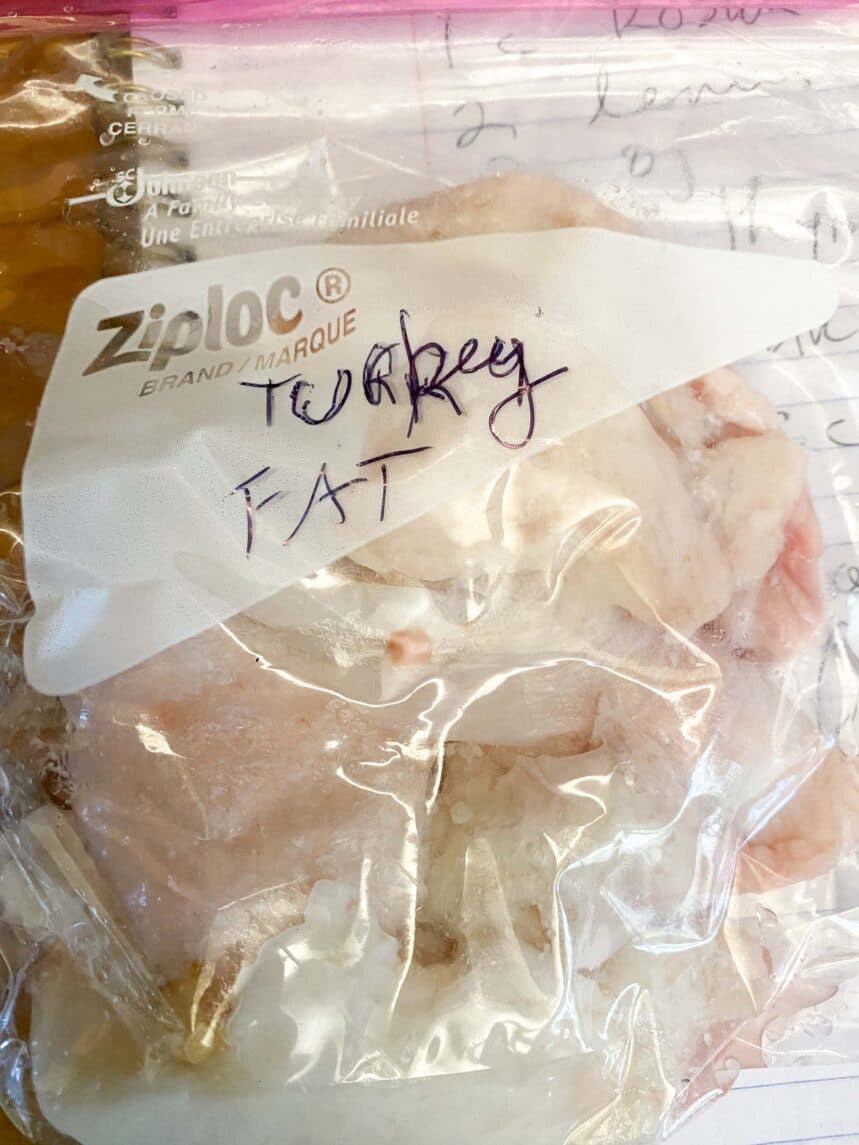
Also, at this time I trim away any excess fat. But don’t throw it out! I save in a zip-top bag in the freezer for later when I render it for amazing fried potatoes.
Can You Spatchcock The Turkey After Brining?
You can spatchcock and halve the turkey before or after brining but I do it before because it is less messy and makes it easier to submerge in the brine. Less unwieldy.
Salt: Choose The Right Kind
If you have spent any time here at FODMAP Everyday® you know that we use kosher salt for cooking and table salt for baking. For a complete treatise on salt – which we think is under-appreciated – check out our Explore An Ingredient: Salt.
For this recipe we use kosher salt and specifically Diamond Crystal Kosher Salt. As you will learn in the linked article above, not all salt measures the same way, which means per teaspoon or tablespoon you would get more or less salt, depending on type. Use the salt called for in individual recipes for best results.
Save this article
PS: In general, 1 teaspoon table salt = 1 ½ teaspoons Morton Kosher Salt = 2 teaspoons Diamond Crystal Kosher Salt.
Adding Onion & Garlic Flavor
When I made this turkey, I did not have FreeFod Garlic Replacer or the Onion Replacer in my spice drawer. I have come to love these products and now always keep them at hand. They are a fantastic and easy way to infuse garlic and onion flavor into your low FODMAP cooking. Next time I will definitely use them. They are listed as optional below.
And, What The Heck Are Giblets?
You know when you buy a chicken, or a turkey and you reach inside and pull out that bag of…stuff? Inside the bag are the liver, heart, gizzard and the neck and these are the giblets. Say, “ji-bletts”.
We have all heard the story of folks roasting their first turkey and how they didn’t know to remove the giblets out from the inside of the neck and bird cavity, where they are stored during transport. Don’t forget to!
And once you do, you get to use them to make giblet gravy. First, the giblets are used to enhance a turkey stock. If you like, you can remove them and chop them after the stock is strained and add the cooked giblets to the gravy. You have a choice – smooth gravy, or chunky.
Note that they do have a strong flavor that some folks love, and some do not prefer. Know your audience.
You Will Be Multitasking
Read the recipe through before starting so that you get a gist of the flow. You will be starting the gravy while the turkey is in the oven, and then finishing it off while the turkey rests and you can access and incorporate the pan drippings.
How To Make Citrus Brined Turkey
For the Turkey
Place brining bag in receptacle of choice – bucket, stockpot, etc. Pour in 1 gallon (3.8 L) of water to the bag, then add salt and sugar and stir around a bit to help them begin to dissolve. Stir in the FreeFod Replacers at this time, if using. Add the leek greens, lemons, oranges, thyme, peppercorns, sage and bay leaves and swish around. Add turkey. You want the turkey to be completely submerged in the brine when you close up the bag; add more water if necessary.

Seal the bag tightly and refrigerate overnight. For an added layer of security, I actually used duct tape on the sealed edge of the bag.
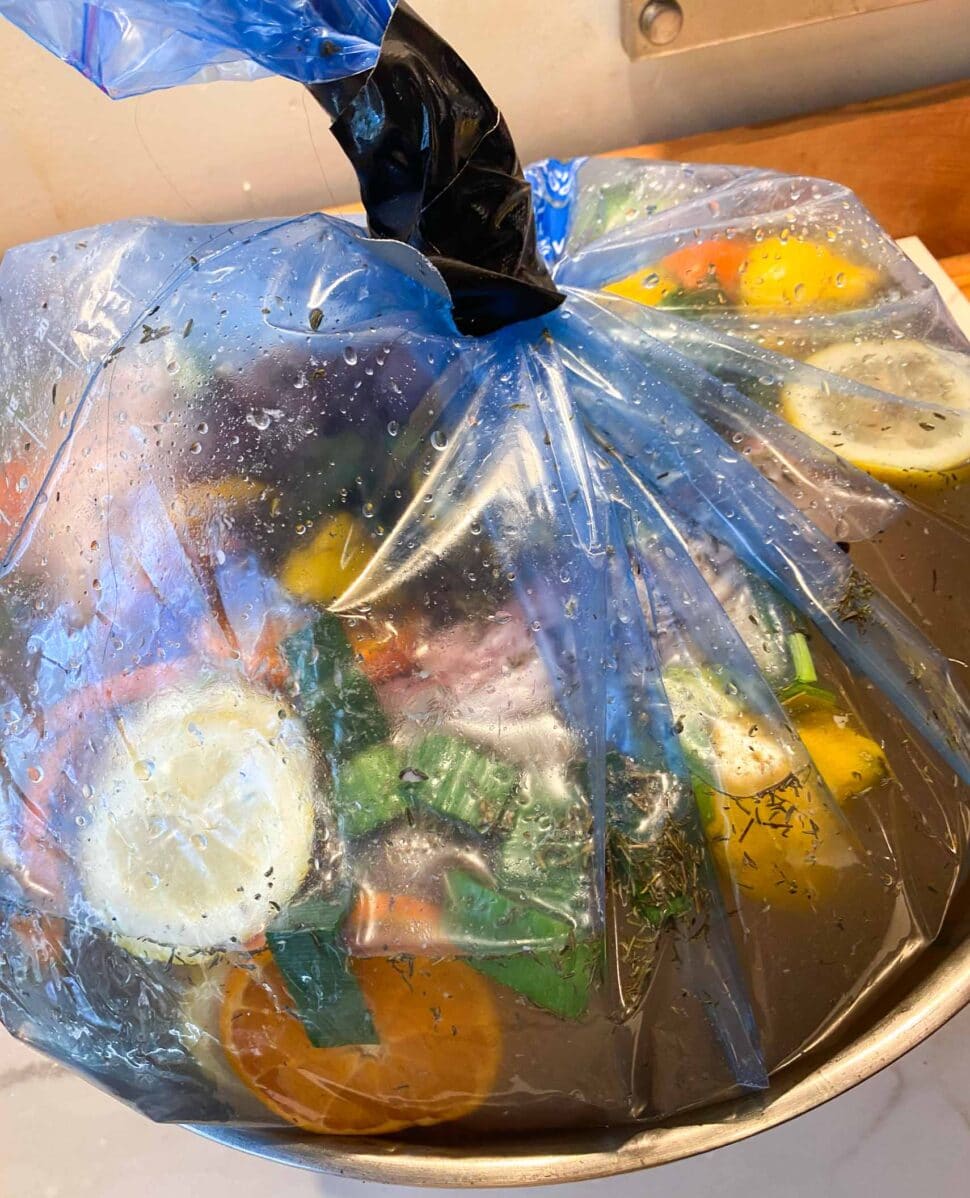
Remove turkey from brine and discard brine and everything in the bag/pot. (See Tips in case you want to save the citrus slices). Pat turkey dry.
Position racks in upper and lower third of oven. Preheat oven to 400°F (200°C). Have ready two sturdy flat roasting pans or half-sheet pans that will each hold half the spatchcocked turkey.
Create a butter rub by very lightly seasoning the soft butter with salt, and generously with pepper. See Tips for additional flavoring ideas.
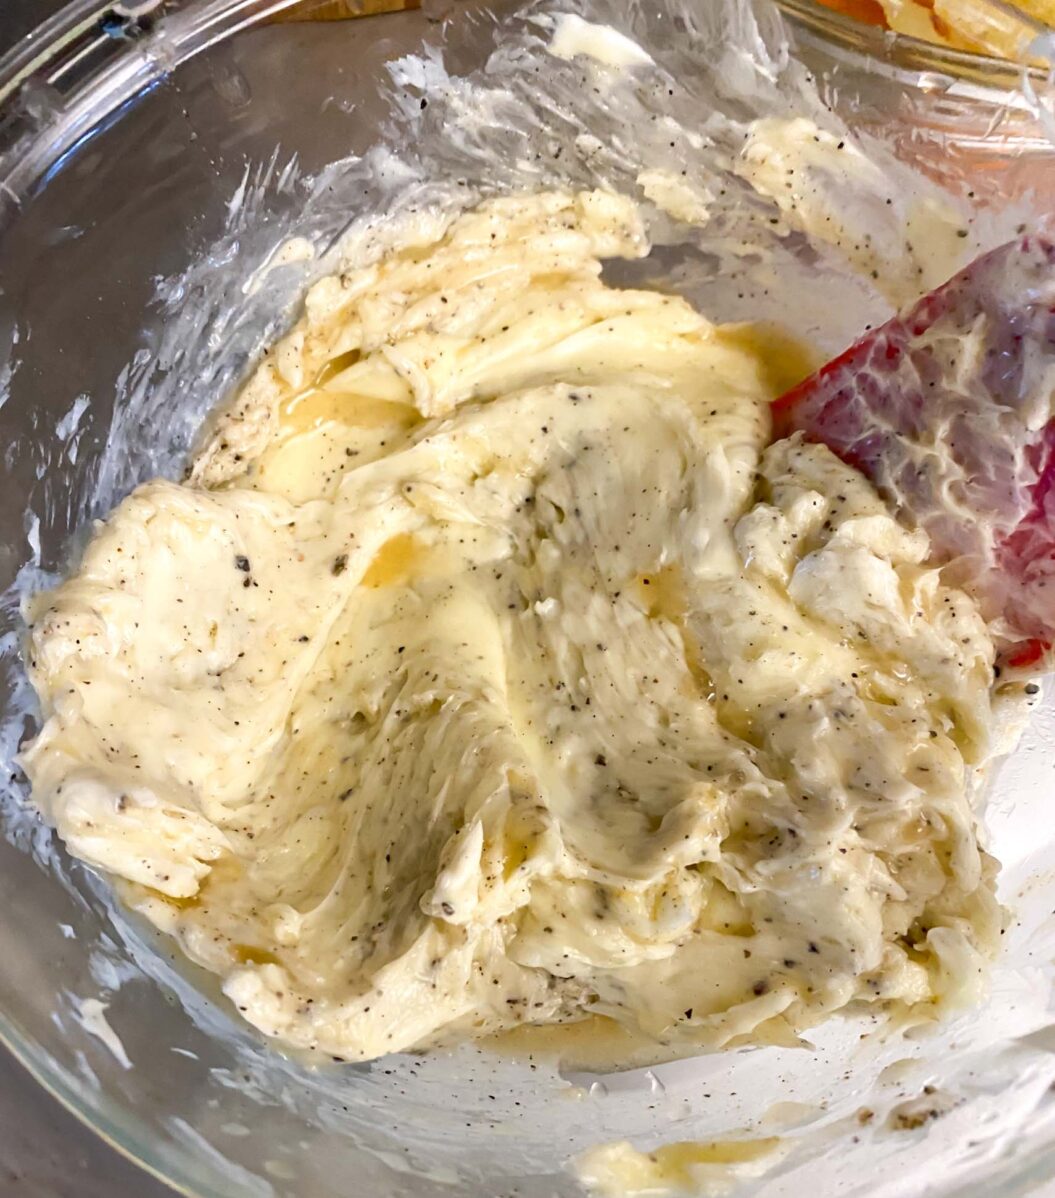
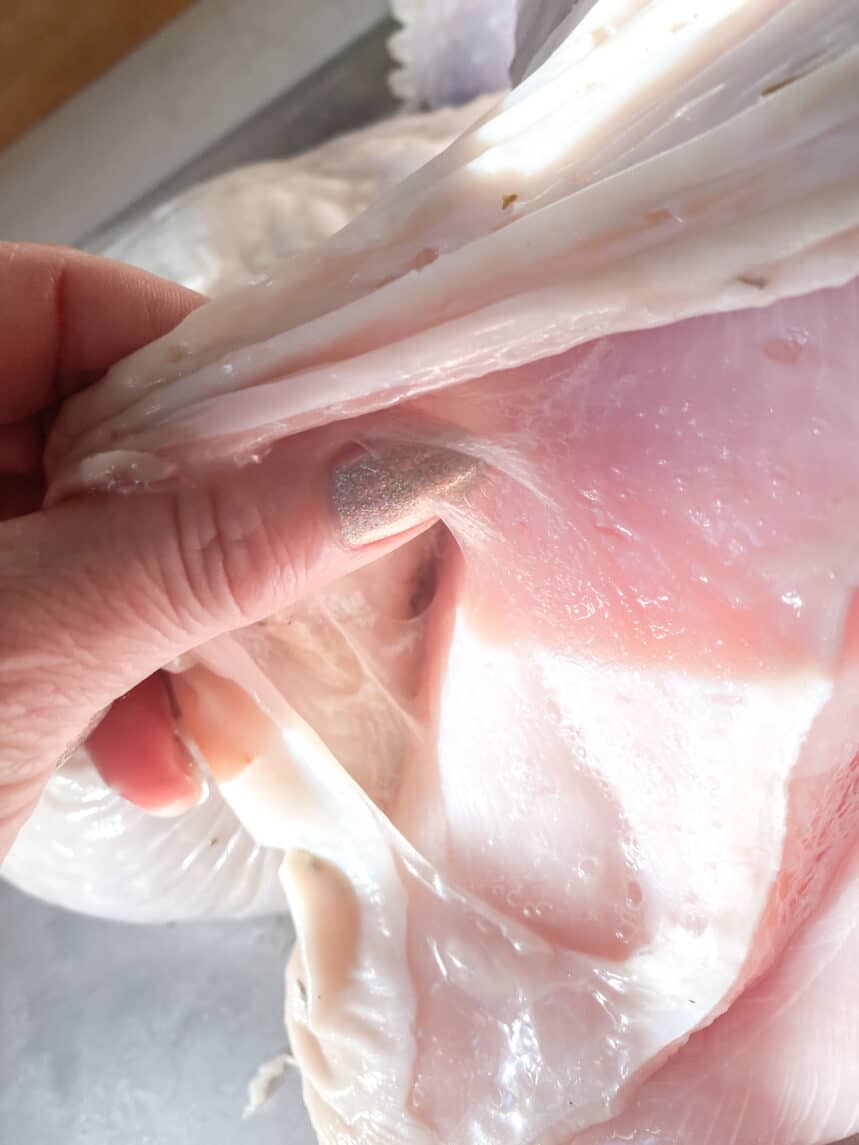
Use your hands to generously and thoroughly coat the turkey both top side and bottom side and also sliding your hands under the skin to get seasoned butter in contact with the breasts (especially) and legs and thighs.
You might have to really use your fingers to separate the skin from the flesh.
Roast the turkey for 1-hour, rotating pans front to back, and higher rack to lower halfway through, taking the opportunity to baste as well. After that first hour, check the temperature of the turkey and keep roasting until the breast meat registers 150°F (65°C) and the thickest part of the thigh reach 165°F (74°C). The skin should be golden.
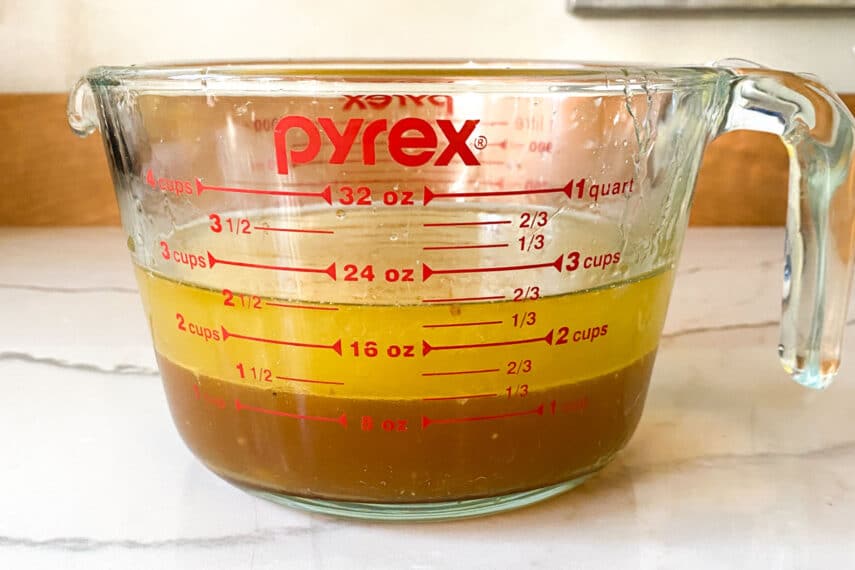
Remove turkey from the oven. Pour off all the pan drippings into a fat separator or large measuring cup.
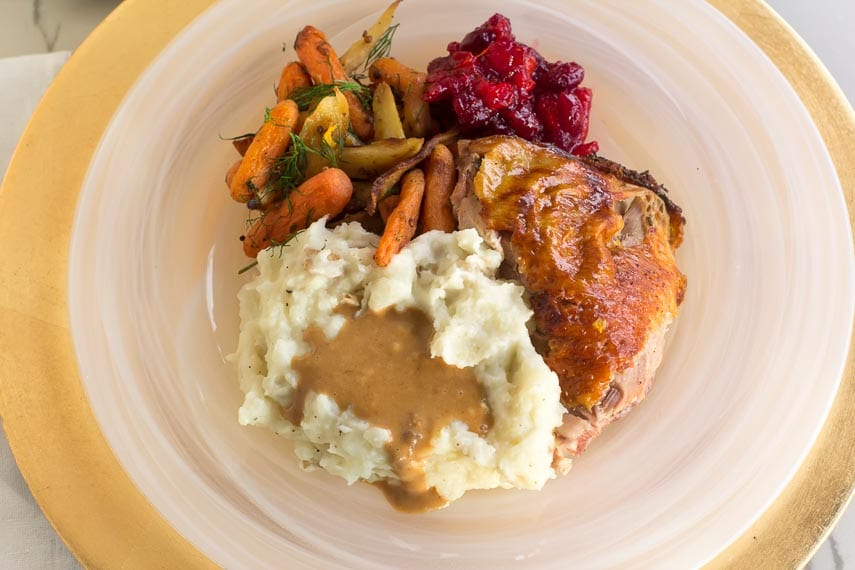
Let the turkey rest for about 15 minutes, then carve and serve with gravy; see below.
For the Gravy
While turkey is roasting, roughly chop the neck, backbone, and giblets. Take the pan drippings from the turkey and pour off all but 1 tablespoon of the fat, reserving the drippings. You can also use a ladle to remove the fat.
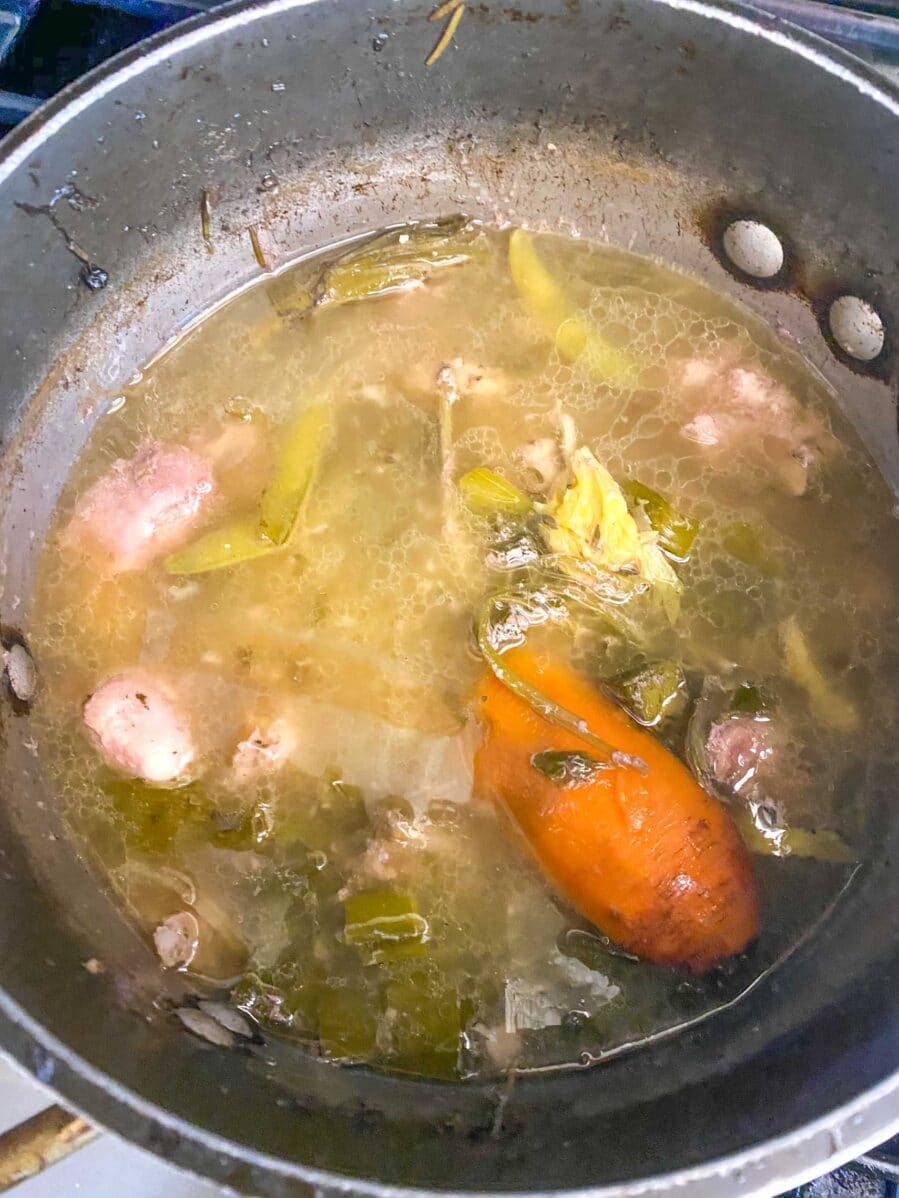
Heat that 1 tablespoon of fat in a large, heavy saucepan over medium heat until shimmering. Add chopped turkey parts and cook for about 5 minutes, stirring occasionally, until lightly browned. Add leek greens, carrot and celery and continue to cook, stirring occasionally, until vegetables start to soften, about another 5 minutes. Add 1 ½ – quarts (1.4 L) chicken stock, bring to a boil, then adjust heat and simmer for 1 hour.
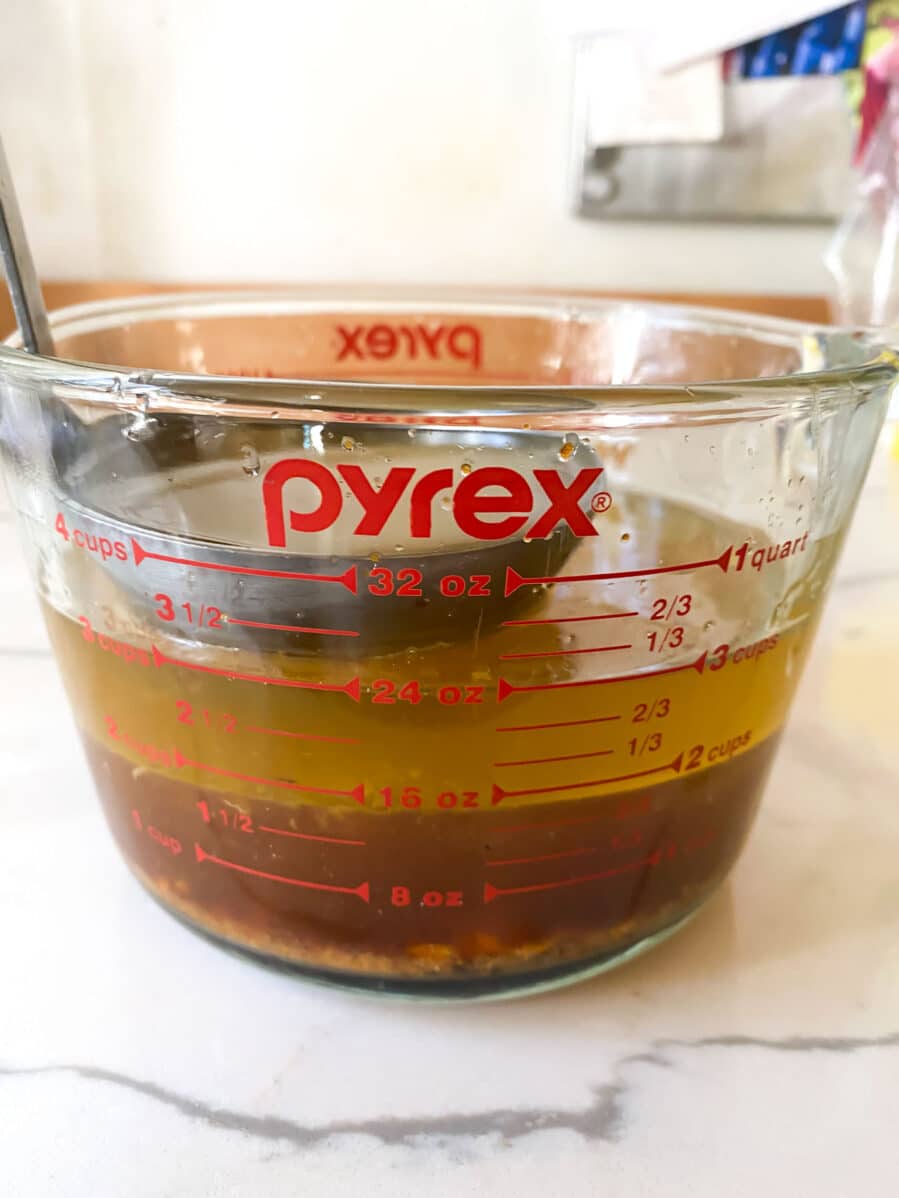
Strain through a fine mesh strainer into a fat separator or large measuring cup.
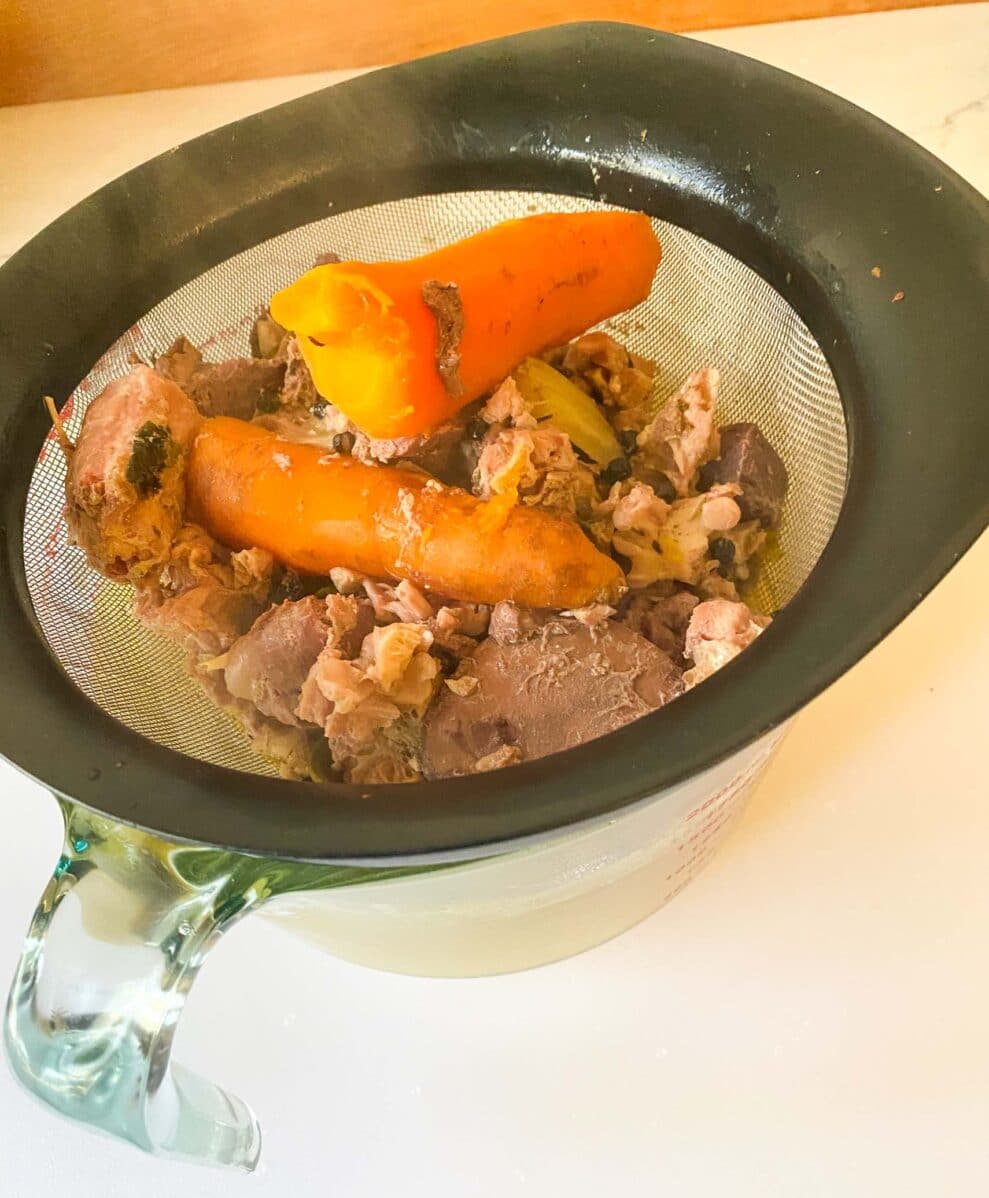
Reserve giblets and chop them finely if you want to add them to your giblet gravy. Discard other solids and fat.
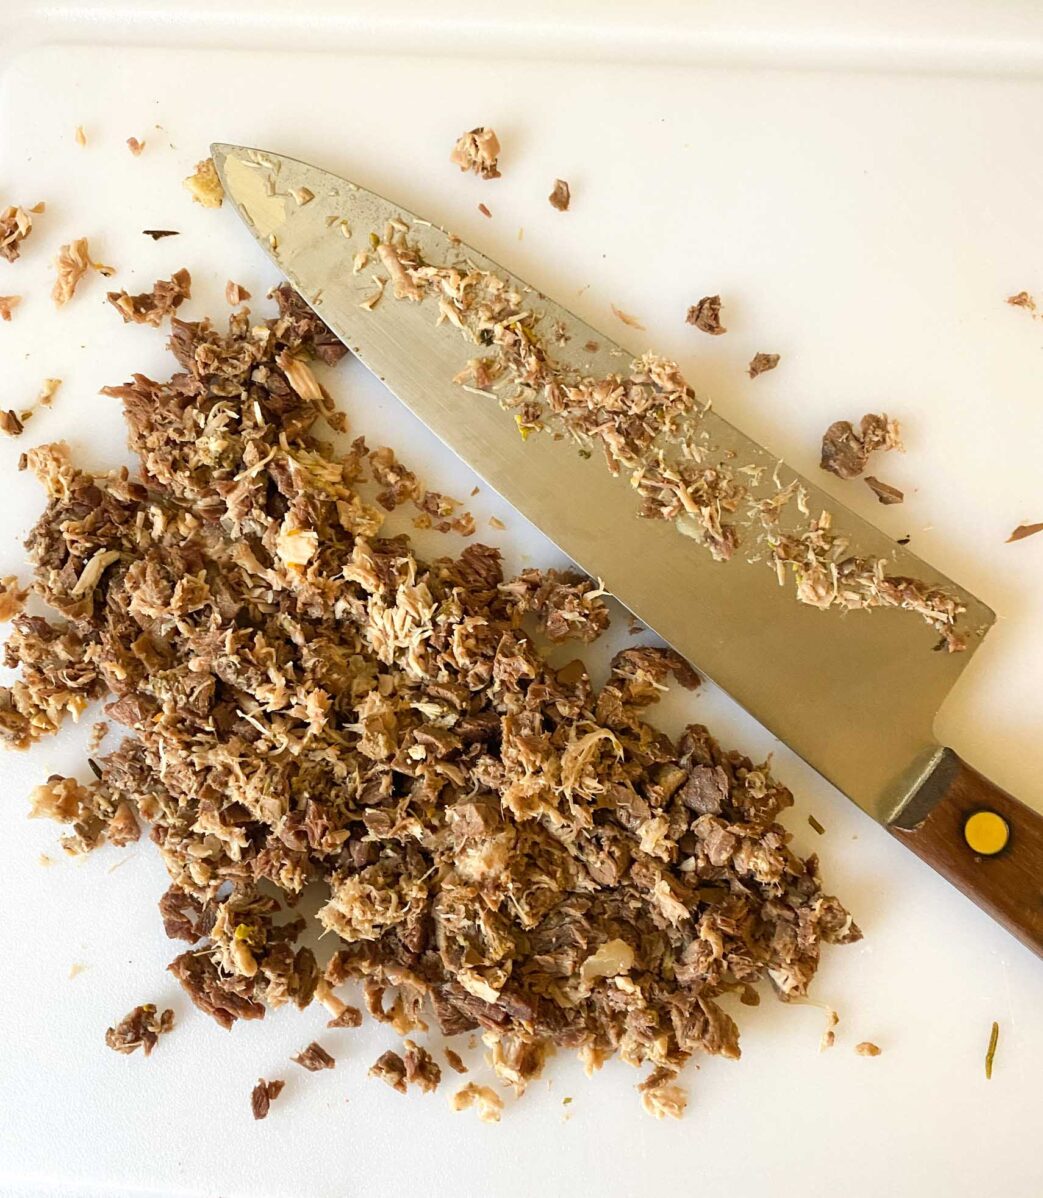
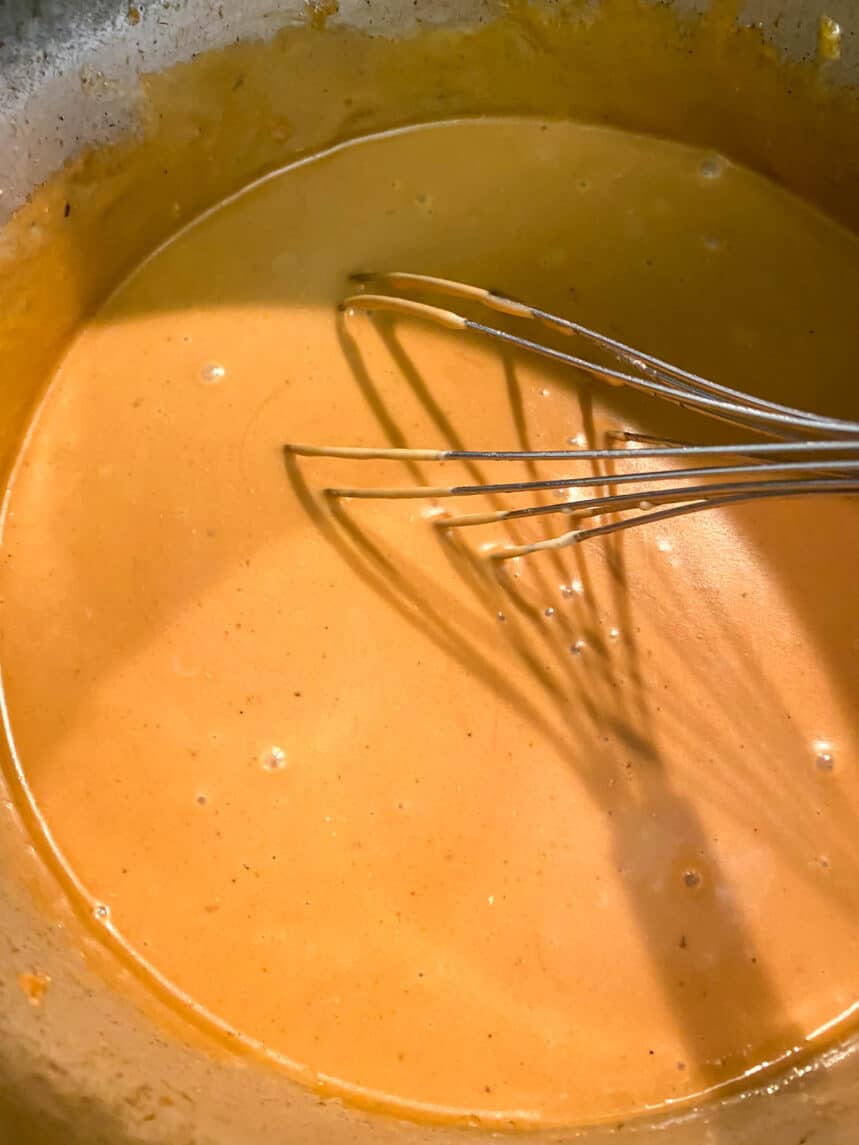
Melt the butter over low-medium heat in a large saucepan. Whisk in flour and cook, whisking constantly, until flour begins to take on a little color. While whisking, add the reserved stock in a thin, steady stream until it is all incorporated, then whisk in reserved pan drippings. Bring to a simmer and cook for at least 10 minutes, whisking as needed, until the gravy is slightly reduced, thick and silky. Add chopped giblets, if you like.
Season to taste with salt and pepper and keep warm.
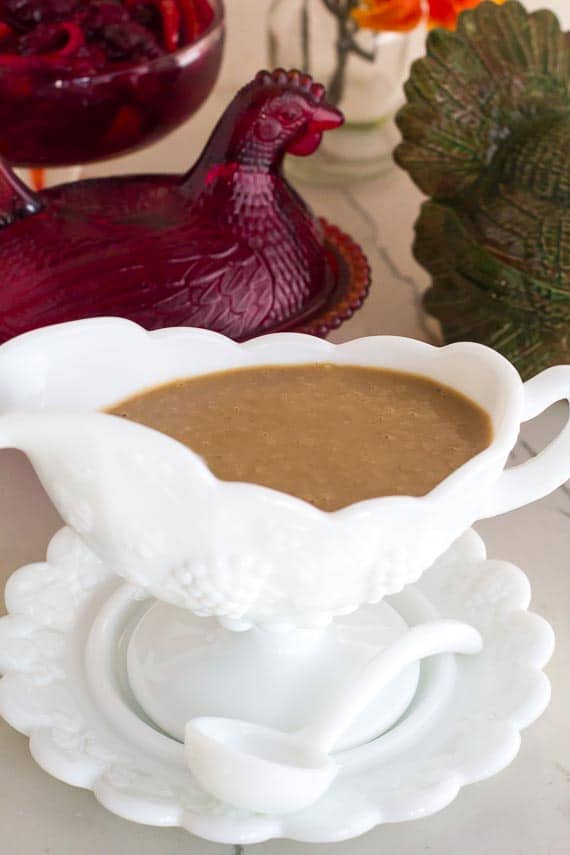
Offer with carved turkey (and of course mashed potatoes, cranberry sauce, stuffing…).
Spatchcocked Low FODMAP Citrus Brined Turkey with Giblet Gravy
Our Spatchcocked Low FODMAP Citrus Brined Turkey might just be the quickest to roast, crispiest skinned, juiciest fleshed turkey you have ever made or tasted. Spatchcocking allows a turkey to roast “flat” on the pan, creating an even roasting environment so that your turkey is never dry, and the skin is always crisp.
Ingredients:
Turkey:
- Brining bag large enough to hold your bird
- Water, at cool room temperature
- 1 cup (134 g) Diamond Crystal Kosher Salt
- ½ cup (107 g) firmly packed light brown sugar
- 2 teaspoons FreeFod Garlic Replacer; optional
- 2 teaspoons FreeFod Onion Replacer; optional
- 2 cups (100 g) roughly chopped leeks, green parts only
- 2 lemons, scrubbed and sliced crosswise into thin rounds
- 2 oranges, scrubbed and sliced crosswise into thin rounds
- 2 tablespoons dried thyme, crushed
- 1 tablespoon whole black peppercorns
- 1 tablespoon rubbed, ground sage
- 6 dried bay leaves
- 20- pound (9 kg) turkey, spatchcocked, divided in two and patted dry; reserve backbone
- 1 cup (226 g; 2 sticks) unsalted butter, softened
- Kosher salt
- Freshly ground black pepper
Gravy:
- Reserved fat and drippings from roasted turkey
- Giblets from turkey
- Backbone from turkey
- ½ cup (25 g) roughly chopped leeks, green parts only
- 1 medium carrot, trimmed, scrubbed, roughly chopped
- 1 medium stalk celery, trimmed, roughly chopped
- Kosher salt
- Freshly ground black pepper
- 1 ½ – quarts (1.4 L) Low FODMAP Chicken Stock, or purchased equivalent, preferably low sodium, plus extra as needed
- 3 tablespoons unsalted butter
- ¼ cup (36 g) low FODMAP gluten-free all-purpose flour
Preparation:
-
For the Turkey: Place brining bag in receptacle of choice – bucket, stockpot, etc. Pour in 1 gallon (3.8 L) of water to the bag, then add salt and sugar and stir around a bit to help them begin to dissolve. Stir in the FreeFod Replacers at this time, if using. Add the leek greens, lemons, oranges, thyme, peppercorns, sage and bay leaves and swish around. Add turkey. You want the turkey to be completely submerged in the brine when you close up the bag; add more water if necessary.
-
Seal the bag tightly and refrigerate overnight. For an added layer of security, I actually used duct tape on the sealed edge of the bag. Remove turkey from brine and discard brine and everything in the bag/pot. (See Tips in case you want to save the citrus slices). Pat turkey dry.
-
Position racks in upper and lower third of oven. Preheat oven to 400°F (200°C). Have ready two sturdy flat roasting pans or half-sheet pans that will each hold half the spatchcocked turkey.
-
Create a butter rub by very lightly seasoning the soft butter with salt, and generously with pepper. See Tips for additional flavoring ideas. Use your hands to generously and thoroughly coat the turkey both top side and bottom side and also sliding your hands under the skin to get seasoned butter in contact with the breasts (especially) and legs and thighs.
-
Roast the turkey for 1-hour, rotating pans front to back, and higher rack to lower halfway through, taking the opportunity to baste as well. After that first hour, check the temperature of the turkey and keep roasting until the breast meat registers 150°F (65°C) and the thickest part of the thigh reach 165°F (74°C). The skin should be golden.
-
Remove turkey from the oven. Pour off all the pan drippings into a fat separator or large measuring cup. Let the turkey rest for about 15 minutes, then carve and serve with gravy; see below.
-
For the Gravy: While turkey is roasting, roughly chop the neck, backbone, and giblets. Take the pan drippings from the turkey and pour off all but 1 tablespoon of the fat, reserving the drippings. Heat that fat in a large, heavy saucepan over medium heat until shimmering. Add chopped turkey parts and cook for about 5 minutes, stirring occasionally, until lightly browned. Add leek greens, carrot and celery and continue to cook, stirring occasionally, until vegetables start to soften, about another 5 minutes. Add 1 ½ – quarts (1.4 L) chicken stock, bring to a boil, then adjust heat and simmer for 1 hour. Strain through a fine mesh strainer into a fat separator or large measuring cup and discard the solids. Discard fat.
-
Melt the butter over low-medium heat in a large saucepan. Whisk in flour and cook, whisking constantly, until flour begins to take on a little color. While whisking, add the reserved stock in a thin, steady stream until it is all incorporated, then whisk in reserved pan drippings. Bring to a simmer and cook for at least 10 minutes, whisking as needed, until the gravy is slightly reduced, thick and silky. Season to taste with salt and pepper and keep warm, offering with carved turkey (and of course mashed potatoes, cranberry sauce, stuffing…).
Notes:
Tips
- A messy but lovely variation is to infuse extra citrus flavor to the butter rub. Reserve some of the lemons and oranges from the brine and chop up the citrus flesh, discarding the peel. Fold this into your softened butter before slathering your turkey, inside and out. Even though the citrus was in contact with the raw turkey, it will be cooked along with the turkey. Do not use this butter raw.
FODMAP Information
Our recipes are based on Monash University and FODMAP Friendly science.
- Butter: Both Monash University and FODMAP Friendly have lab tested butter. Monash states that a low FODMAP Green Light portion is 1 tablespoon or 19 g and also states that “butter is high in fat and does not contain carbohydrates (FODMAPs)”. FODMAP Friendly gives it a “Pass” at 1 tablespoon or 19 g. Both recommended serving sizes are presented as part of healthy eating guidelines, not as maximum FODMAP serving size. Fat can affect guy motility and trigger IBS symptoms in some people. Eat to your tolerance.
- Leeks: The green parts of leeks are low FODMAP as determined by Monash University lab testing and can be used to add onion flavor to your low FODMAP cooking.
- Navel Oranges: Monash University has lab tested navel oranges and states that no FODMAPs were detected upon lab testing; they set a serving size at 1 medium fruit (130 g).
- Oil: All pure oils are fats and contain no carbohydrates, therefore they contain no FODMAPs.
Please always refer to the Monash University & FODMAP Friendly smartphone apps for the most up-to-date lab tested information. As always, your tolerance is what counts; please eat accordingly. The ultimate goal of the low FODMAP diet is to eat as broadly as possible, without triggering symptoms, for the healthiest microbiome.
Nutrition
All nutritional information is based on third-party calculations and should be considered estimates. Actual nutritional content will vary with brands used, measuring methods, portion sizes and more. For a more detailed explanation, please read our article Understanding The Nutrition Panel Within Our Recipes.