
This pizza dough recipe employs a long, 3-day fermentation period during which the fructans in the wheat-based dough are reduced, creating a lower FODMAP recipe.
This 72-Hour Ferment Low FODMAP Pizza is just one of our many low FODMAP pizza doughs we have for you. This one is based on King Arthur Unbleached Bread Flour, which has a 12.7% protein content and is made from U.S. grown hard red wheat. This pizza dough is not gluten-free, but the low FODMAP diet is not a gluten-free diet (see more below).
For a true sourdough approach, please see our Low FODMAP Sourdough Pizza. Our Wood-Fired Low FODMAP Neapolitan-Style Pizza also has a long fermentation time, using a specialized flour.

Know Your Tolerances
This recipe has not been lab tested. If you are stable, love pizza and are willing to give it a go, why not try our 72-Hour Ferment Low FODMAP Pizza during your Challenge Phase? For a much more in-depth discussion on how to pick low FODMAP bread and bready products, like pizza, please read How To Choose Low FODMAP Bread.
And before you make any of our pizzas, please read our articles Everything You Need to Know About Low FODMAP Pizza and Low FODMAP Pizza Ingredients & Equipment.
Set Yourself Up For Success
These first few paragraphs below are about how to set yourself up for success with this recipe – firstly, for actually making a great pizza, and also for setting yourself up for success with your digestion.
Making the pizza the best it can be means you should read the recipe thoroughly and follow the directions for ingredients and preparation. Remember you need to build-in the 3-day fermentation period.
As far as how you will digest this pizza, the only way to tell is to try it. What works for you or me is not necessarily what will work well for your BFF or mine, my husband or your daughter. But there are some approaches that are better than others.
Do Try This Pizza If:
- You are stable and in your Challenge Phase.
- You know that you digest wheat fructans well.
- You have had digestive success with a wide range of wheat-based sourdough breads and baked products (other pizzas, bagels, etc.)
Skip This Pizza If:
- You are very sensitive to fructans in general.
- You follow a gluten-free diet.
- You have failed your fructan wheat Challenge.
- You are not stable digestively and/or you are in Elimination.

How Is This Pizza Low FODMAP?
Hopefully you have read all of the information that came before this question and answer. To reiterate: this recipe is not gluten-free. The fructans reduce during the fermentation period because the process of fermentation itself feeds on the fructans that are present, although we cannot be sure how much fructan reduction actually occurs during this period.
Sourdough vs. Fermentation
Merriam-Webster defines sourdough bread as: “a leaven consisting of dough in which fermentation is active”, and we certainly see that in our Low FODMAP Sourdough Pizza. But when it comes to the low FODMAP diet, what we are looking for is a reduction of fructans (not just developing a classic sourdough taste) and that can take place in a traditional sourdough as well as in a fermented dough made with baker’s yeast, such as this one. And the longer the fermentation time the greater the fructan reduction and ours is 72-hours long, which is on the longer side.
So, to recap, this 72-Hour Ferment Low FODMAP Pizza dough is fermented for a long period of time and fructans are reduced – we just do not know specifics without lab testing, and chances are that each batch would be different anyway!
Eat to your own tolerances.
Study Your Monash App
And, just to point out what is readily available on the Monash app, even conventional bread made with wheat flour is low FODMAP in servings sizes that average about 25 g.
Save this article
Sourdough bread (made via a fermentation process) made with wheat flour can have low FODMAP serving sizes of over 100 g, which is equivalent to 2 average slices.
The low FODMAP diet is neither wheat-free, nor gluten-free.
Determine The Right Serving Size For YOU
Start with a small serving of this pizza using the serving sizes mentioned here. The serving size of this pizza that is right for you will be unique and individual to you.
Try to use the King Arthur Unbleached Bread Flour. If you cannot access it, or want to try another flour, please use a flour that is 12.7% protein and preferably made from hard red wheat for best results.
Semolina is simply a type of flour made from durum wheat. It contains gluten. As you know by now this recipe is not gluten-free (nor is the low FODMAP diet) and it is also not necessarily free of, or low enough in fructans for everyone with IBS to tolerate it. Know your tolerance for wheat and fructans. I use it to dust the peel, after the dough is made and shaped.
Use a medium grind cornmeal as an alternative if you like. The semolina or cornmeal will come into play when you transfer the dough to your peel and are about to launch your pizza into the oven. They act as a buffer – like little ball bearings – and help the pizza get onto your baking steel. More on the baking steel recommendation below.
This recipe will work best if the flour is weighed with a scale. I offer you both volume and weights; I highly recommend you use the weights in this recipe. The reason why the smaller ingredient amounts are by volume only is because most home scales are not sensitive enough to weigh such small amounts.
If you are going to measure your flour by volume, please review our article How To Measure Dry Ingredients By Volume.
Yes, you can. Instructions are below in the recipe, along with directions for using a stand mixer.
The 3-day waiting period is suggested for a few reasons. First of all, it is during this time that the fructans are reduced, but there are other reasons as well. The flavor, texture and workability of the dough also improve greatly after a 3-day wait. You could do a 24-hour or 48-hour fermentation and try that too, but we think 3-days is a sweet spot.
Dough fermentation takes place organically – on its own – but there are various ways to help it along.
* Is the dough cold fermented (in the fridge) or fermented at room temperature?
* Is it fermented as a portioned ball, or is it bulk fermented?
* Does the dough sit out prior to cold fermentation, and if so, for how long? Or does it go straight into the refrigerator?
* And how long is the dough fermented at any of these stages?
We could get into a lively discussion about which approach is “best”, but I am not going to do that simply because at any given time and with any given recipe one approach might be better. And it can change. If you are in a warm, humid environment like Florida you might use a different approach for the same recipe being made in a cold, norther climate.
If you peruse our pizza recipes you will see that I have used many different preparation methods. In this way, as you work your way through the recipes (if you are so inclined), you will become familiar with a variety of approaches.
For this 72-Hour Ferment Low FODMAP Pizza I have chosen to do a bulk fermentation for a period of time at room temperature, after which the dough is balled. The individual dough balls are then set aside in the refrigerator to ferment for 72 hours. The balls are brought out of the refrigerator and allowed to rest before being formed into pizzas.
I am going to give it to you straight. This recipe works beautifully if you make it as written; just look at the gorgeous pizza images on this page. If you make any changes to ingredients or equipment, your pizza will not come out the same way and will most likely suffer.
You wouldn’t ask if you could leave out the yeast, right? I do consider the baking steel to be part of this recipe, just like ingredients and temperature. If you have a pizza stone, you can try it. Make sure to preheat in the oven for a full hour before launching your pizza – but the resulting pizza will still not be as great as when made with a Baking Steel, which has to be preheated for a full hour as well.
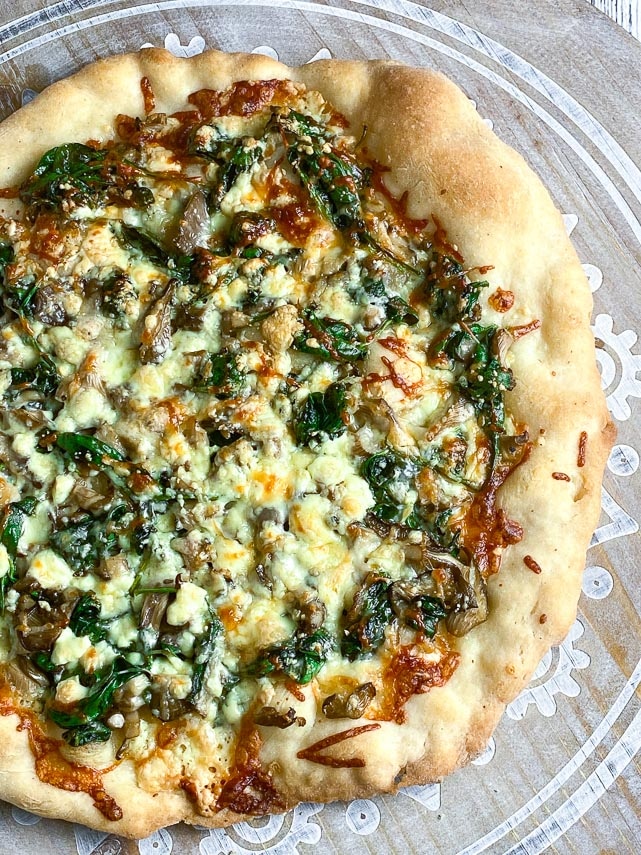
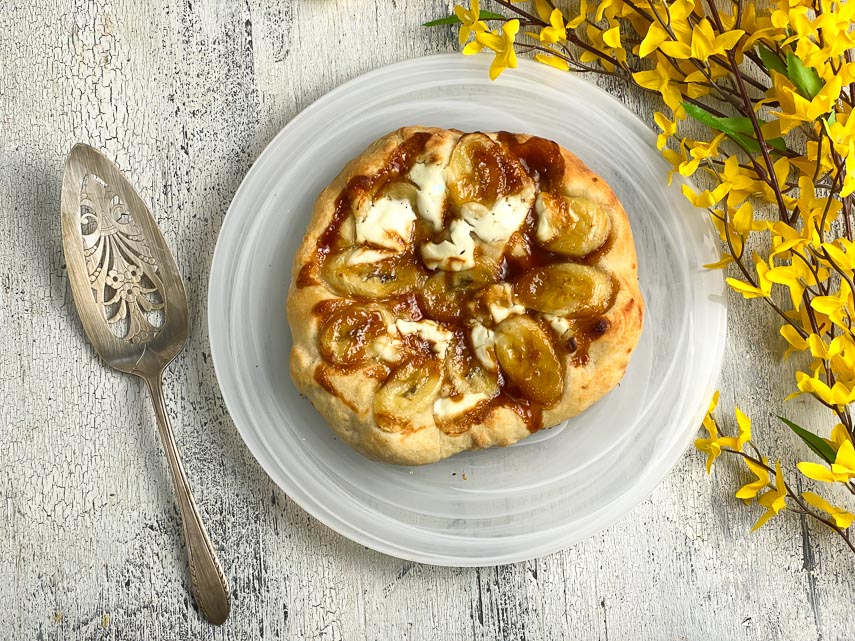
Any low FODMAP toppings your heart desires. I have just given you some basics below. Review some ideas in our article Everything You Need to Know About Low FODMAP Pizza.
Look at just some of our creations on this page, and here is a list of just some of the fun we had with this dough:

How To Make 72-Hour Ferment Low FODMAP Pizza
NOTE: We have updated the instructions per some of the comments. Please pay attention to room temperature vs. refrigeration requirements.
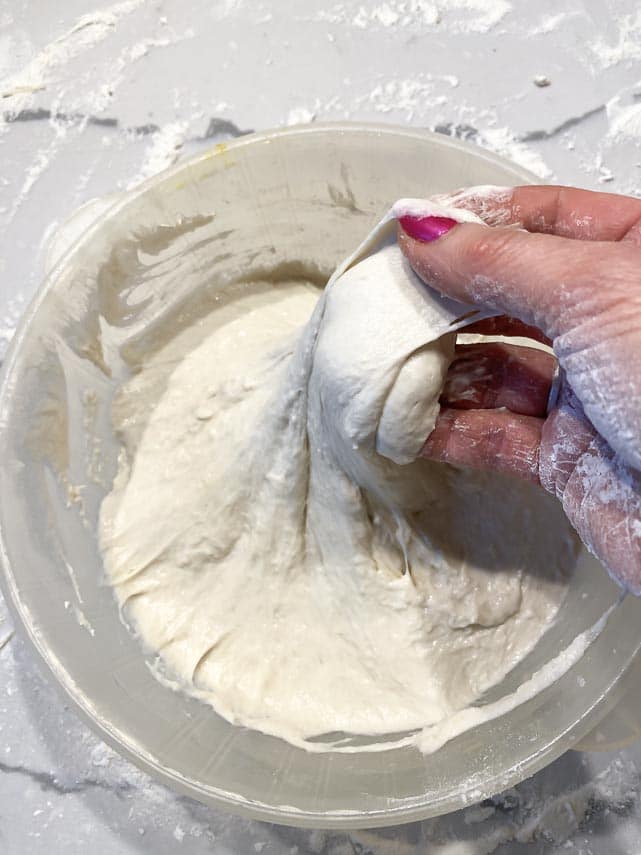
For Making By Hand: Whisk together the 500 g of flour, salt and instant yeast in a large bowl to aerate and combine.
Add the warm water and begin to stir together with a sturdy wooden spoon until a wet dough forms, then beat vigorously until mixture looks like a firm, somewhat moist batter with a little elasticity.
For Making With A Stand Mixer: Place the 500 g of flour, salt and instant yeast in stand mixer bowl fitted with flat paddle or dough hook attachment and mix on low to aerate and combine. Add the warm water and mix on low-medium speed until a wet dough forms, then turn speed up to medium to medium-high and beat until mixture looks like a firm, somewhat moist batter with a little elasticity. Do not stop short of being able to see the elasticity.
Very lightly coat a bowl or container with olive oil, scrape the dough into the receptacle and turn the dough around to coat with oil. Seal the bowl with plastic wrap, or snap on a cover to the container.
Let sit at warm room temperature for 24 hours then unmold onto work surface. Unlike the gluten-free doughs, this one will show off its gluten network and be quite elastic.
Divide into three equal pieces, forming each into a smooth ball, creating domed tops and tucking edges underneath.
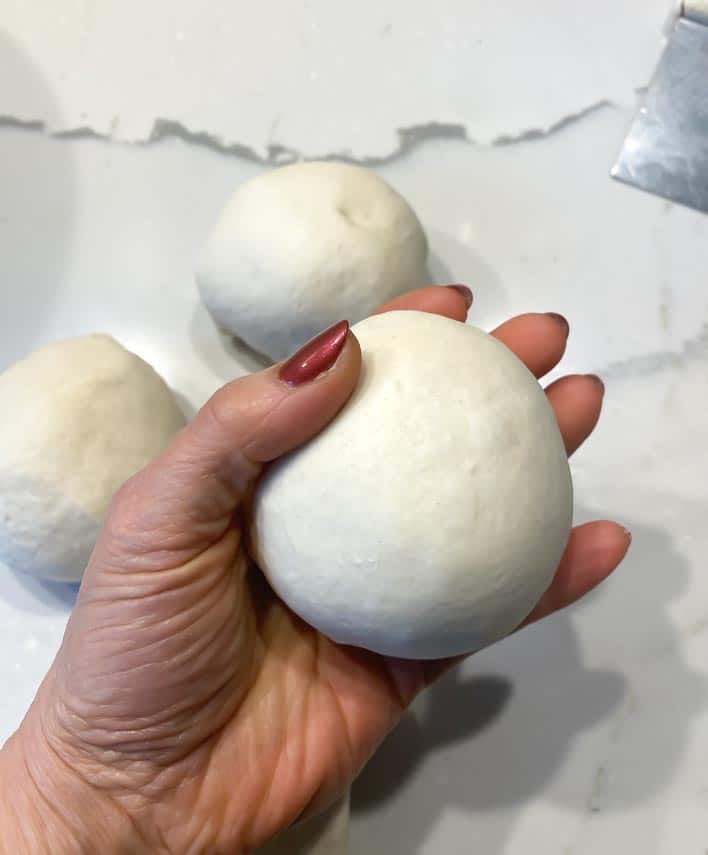
Place each ball in an individual containers or one large container, either way allowing room for the balls to expand in size. Very lightly coat with oil, seal container(s) and refrigerate for 72-hours.
Remove from refrigerator at least 2 hours before cooking pizzas, leaving covered. Timing might vary; you want it to be room temp.
Meanwhile, prep your sauce and toppings, which should be room temperature, or at least not cold.
Position rack in the hottest area of your oven. Place baking steel on rack. Preheat oven to 500°F (260°C) and allow baking steel to preheat for 1 full hour. One. Full. Hour.
One at a time, press each of your dough balls out on your floured surface into individual discs, each about 10 to 11-inches (25 cm to 28 cm) around.

You can also use a rolling pin, if you like, but it isn’t necessary nor is it preferable. Keep everything lightly floured and keep moving the dough around to prevent sticking. Dust your peel with semolina, cornmeal or more flour, transfer the raw pizza disc to the peel, add your toppings and get it into the oven ASAP. Bake for about 8 to 10 minutes or until cheese is melted and bubbly (or toppings are “done”) and crust has some nice char marks. Serve immediately. Repeat with remaining dough balls.

FODMAP Information
Our recipes are based on Monash University and FODMAP Friendly science.
- Canned Tomatoes: Monash University has lab tested canned tomatoes and they are low FODMAP at 92 g or 3.2-ounces, which they say is about ⅗ of a cup. Moderate FODMAPs kick in at about ¾ cup or 115 g, at which point fructose can become an issue.
- Cheese: Many cheeses have low FODMAP serving sizes. The low FODMAP diet is not a dairy-free diet. Hard cheeses such as Parmigiano Reggiano or Pecorino Romano have been lab tested by Monash University and are low FODMAP in 40 g amounts.
- Oil: All pure oils are fats and contain no carbohydrates, therefore they contain no FODMAPs.
- Sugar: Monash University and FODMAP Friendly have both lab tested white, granulated sugar. Monash states that a Green Light low FODMAP serving size of white sugar is ¼ cup (50 g). FODMAP Friendly simply states that they have tested 1 tablespoon and that it is low FODMAP. Regular granulated white sugar is sucrose, which is a disaccharide made up of equal parts glucoseand fructose. Sucrose is broken down and absorbed efficiently in the small intestine.
- Tomatoes: Both Monash University and FODMAP Friendly have lab tested common, beefsteak tomatoes. Monash University lab tests have shown no FODMAPs. FODMAP Friendly gives them a “Pass” at ½ cup (75 g) portions. Cherry tomatoes and Plum (Roma) tomatoes have also been tested by Monash and FODMAP Friendly. Both Monash and FODMAP Friendly recommend 75 g of cherry tomatoes as a serving (about 5 or ½ cup) and 75 g of plum or Roma tomatoes, which is about 1 small tomato or ½ cup.
- Wheat Flour: The low FODMAP diet is neither wheat-free nor gluten-free. Small amounts of wheat are low FODMAP. For instance, 35 g of wheat bread made with white wheat flour – about 1 slice – has been lab tested by Monash University and is deemed low FODMAP.
- Yeast: Yeast – fresh, dry and instant – are all low FODMAP.
Please always refer to the Monash University & FODMAP Friendly smartphone apps for the most up-to-date lab tested information. As always, your tolerance is what counts; please eat accordingly. The ultimate goal of the low FODMAP diet is to eat as broadly as possible, without triggering symptoms, for the healthiest microbiome.

72-Hour Ferment Low FODMAP Pizza
This 72-Hour Ferment Low FODMAP Pizza is just one of our many pizza doughs. It is based on King Arthur Unbleached Bread Flour, which has a 12.7% protein content and is made from U.S. grown hard red wheat. This pizza dough is not gluten-free, but the low FODMAP diet is not a gluten-free diet (see more below). This pizza dough recipe uses baker's yeast and a long, 3-day fermentation period during which the fructans in the wheat-based dough are reduced. For a true sourdough approach, please see our Low FODMAP Sourdough Pizza.
Low FODMAP Serving Size Info: Makes 3, approximately 11-inch (28 cm) pizzas; approx. 9 servings BUT the right serving size for YOU can only be determined BY YOU.
Ingredients:
Pizza Dough:
- 500 grams (3 ½ cups) unbleached 12.7% protein bread flour, such as King Arthur Bread Flour, plus extra
- 2 teaspoons salt
- ¼ teaspoon instant yeast
- 1 ½ cups (360 ml) warm water, 120°F to 125°F (48°C to 52°C)
- Semolina, medium-grind cornmeal or extra flour
Sauce & Toppings:
- 1 ½ cups (360 ml) Low FODMAP Pizza Sauce or low FODMAP marinara
- 12- ounces (340 g) shredded or thinly sliced low-moisture mozzarella
- Low FODMAP pepperoni
- Sautéed red or green peppers or oyster mushrooms
- Other low FODMAP toppings
- Fresh basil leaves; optional – to be added before or after baking
Preparation:
-
For Making By Hand: Whisk together the 500 g of flour, salt and instant yeast in a large bowl to aerate and combine. Add the warm water and begin to stir together with a sturdy wooden spoon until a wet dough forms, then beat vigorously until mixture looks like a firm, somewhat moist batter with a little elasticity.
-
For Making With A Stand Mixer: Place the 500 g of flour, salt and instant yeast in stand mixer bowl fitted with flat paddle or dough hook attachment and mix on low to aerate and combine. Add the warm water and mix on low-medium speed until a wet dough forms, then turn speed up to medium to medium-high and beat until mixture looks like a firm, somewhat moist batter with a little elasticity. Do not stop short of being able to see the elasticity.
-
Very lightly coat a bowl or container with olive oil, scrape the dough into the receptacle and turn the dough around to coat with oil. Seal the bowl with plastic wrap, or snap on a cover to the container.
-
Let sit at warm room temperature for 24 hours then unmold onto work surface. Timing may vary; you want it to be room temperature. The dough will be quite elastic. Divide into three equal pieces, forming each into a smooth ball, creating domed tops and tucking edges underneath. Place each ball in an individual containers or one large container, either way allowing room for dough balls to expand. Very lightly coat with oil, seal container (s) and refrigerate for 72-hours.
-
Remove from refrigerator at least 2 hours before cooking pizzas, leaving covered. Timing might vary; you want it to be room temp. Meanwhile, prep your sauce and toppings, which should be room temperature, or at least not cold.
-
Position rack in the hottest area of your oven. Place baking steel on rack. Preheat oven to 500°F (260°C) and allow baking steel to preheat for 1 full hour. One. Full. Hour.
-
One at a time, press your dough balls out on your floured surface into discs about 10 to 11-inches (25 cm to 28 cm) around. You can also use a rolling pin, if you like, but it isn't necessary nor is it preferable. Keep everything lightly floured and keep moving the dough around to prevent sticking. Dust your peel with semolina or more flour, transfer one of the raw pizza discs to the peel, add your toppings and get it into the oven ASAP. Bake for about 8 to 10 minutes or until cheese is melted and bubbly (or toppings are “done”) and crust has some nice char marks. Serve immediately. Repeat with remaining dough balls.
Notes:
FODMAP Information
Our recipes are based on Monash University and FODMAP Friendly science.
• Canned Tomatoes: Monash University has lab tested canned tomatoes and they are low FODMAP at 92 g or 3.2-ounces, which they say is about ⅗ of a cup. Moderate FODMAPs kick in at about ¾ cup or 115 g, at which point fructose can become an issue.
• Cheese: Many cheeses have low FODMAP serving sizes. The low FODMAP diet is not a dairy-free diet. Hard cheeses such as Parmigiano Reggiano or Pecorino Romano have been lab tested by Monash University and are low FODMAP in 40 g amounts.
• Oil: All pure oils are fats and contain no carbohydrates, therefore they contain no FODMAPs.
• Sugar: Monash University and FODMAP Friendly have both lab tested white, granulated sugar. Monash states that a Green Light low FODMAP serving size of white sugar is ¼ cup (50 g). FODMAP Friendly simply states that they have tested 1 tablespoon and that it is low FODMAP. Regular granulated white sugar is sucrose, which is a disaccharide made up of equal parts glucose and fructose. Sucrose is broken down and absorbed efficiently in the small intestine.
• Tomatoes: Both Monash University and FODMAP Friendly have lab tested common, beefsteak tomatoes. Monash University lab tests have shown no FODMAPs. FODMAP Friendly gives them a “Pass” at ½ cup (75 g) portions. Cherry tomatoes and Plum (Roma) tomatoes have also been tested by Monash and FODMAP Friendly. Both Monash and FODMAP Friendly recommend 75 g of cherry tomatoes as a serving (about 5 or ½ cup) and 75 g of plum or Roma tomatoes, which is about 1 small tomato or ½ cup.
• Yeast: Yeast – fresh, dry and instant – are all low FODMAP.
Please always refer to the Monash University & FODMAP Friendly smartphone apps for the most up-to-date lab tested information. As always, your tolerance is what counts; please eat accordingly. The ultimate goal of the low FODMAP diet is to eat as broadly as possible, without triggering symptoms, for the healthiest microbiome.
Nutrition
All nutritional information is based on third-party calculations and should be considered estimates. Actual nutritional content will vary with brands used, measuring methods, portion sizes and more. For a more detailed explanation, please read our article Understanding The Nutrition Panel Within Our Recipes.


I made this dough a couple of days ago and, while it tasted great once it was baked, it was almost impossible to shape into a thin, flat disk without it tearing. I realized after the fact that it had been so long since I last made pizza dough (curse you, IBS!) that I had completely forgotten two of the essential steps of breadmaking: kneading the dough long enough for the gluten to develop, then checking its elasticity using the windowpane test. Had I done so, my dough would have been easy to shape and would not have torn. I thought maybe I had skipped a step in the recipe, so I re-read it carefully and found no mention of kneading. After some research I discovered that there are indeed some no-knead pizza dough recipes out there, but they require an 18- to 24-hour rise at room temperature (the time necessary for the gluten to develop by itself) before the dough is ready to be placed in the refrigerator for up to 3 days.
This is a 72 hour rise and quite standard. You can see in my videos how I shape it. It has worked for us quite well. So sorry you had issues. You can read more here, but this is just one example.
Hi Dédé. I have read the article and recipe that you refer to in your reply (in addition to countless others) and there must be a typo in your recipe. The consensus seems to be that a 72-hour dough requires a very long bulk fermentation at room temperature (usually 24 hours, not a mere 2 hours). I will definitely make this dough again because it has an amazing taste; but I will start with a little bit of kneading, followed by a 24-hour bulk rise at room temperature, then divide it in 3 or 4 portions that I will stretch, tuck and turn a few times as I shape them into balls. Finally, I will place them in the refrigerator for 2 days.
I just attach that recipe as one example. I just made this again this week with a two hour room temperature ferment and then the longer refrigeration and it has worked very well for us. Of course use whatever approach works for you because whether you follow these directions or alter them slightly the same information would be true per FODMAPs. Meaning, they will be reduced during fermentation but there is no guarantee as to how much
If I have been gluten free for years, like over 35 years, but not celiac, I am guessing this will not work for me. I also have IBS and am on the fodmap diet, which is a fairly new development 1.5 years ago. If the flour has gluten in it, I could not eat it, fermented or not. I am assuming. Thank you for all your efforts to make eating low fodmap more easily.
Alene, when I discovered the low FODMAP diet, I had been gluten-free for 25 years – being under the assumption that I had gluten intolerance. BUT, whether I ate a bit of wheat-based things or not, I had IBS symptoms, so it wasn’t foolproof. When I first saw the low FODMAP diet, it seemed so random, and I thought, Hmmmm maybe this random will match My random! Turned out that I did have some measure of gluten intolerance but nowhere what I thought it was. I was MUCH more reactive to fructans in wheat. So, I can enjoy sourdough breads from time to time. Something I never thought I would be able to do. Assumptions with this diet are dangerous:) Not only because they are often wrong, but because they can lead to over-restriction, which can not only keep you from broadening your diet, which is better for your microbiome, but also because it prevents you from enjoying more foods.
I followed the instructions to a tee, but the dough was not elastic at all, and it wouldn’t stretch sufficiently. I left it out for 2 hours covered, but it was still a tiny bit cold. Was that the problem? I ended up making 2 pizzas instead of 3 in order to have enough dough. Since it’s super hot where I live, and I didn’t want to heat up my kitchen, we heated a pizza stone on the grill. I’d like to try this again, but beyond waiting for more than 2 hours for the dough to be 100% warm, I’m not sure what to do. I used King Arthur bread flour. (I’ve had that flour for a while, could it be that it was too old?)
There really is no way for me to tell. Yeast doughs are living an can vary a lot, due to ingredients, technique, ambient heat, etc. PS: I love in New England and 2 hours is not typically long enough for things to come to room temp.