
Super Easy 3-Ingredient Flourless Chocolate Cake
I love chocolate. I love eating it, cooking with it, creating recipes with it, thinking about it smelling it…you get the idea.
I even conduct a Chocolate Tasting Class throughout the year and have always said, when you can get paid to eat and talk about chocolate, you’ve got a sweet deal.
This 3-Ingredient Flourless Chocolate Cake is essentially the same as our Heart Of Gold Flourless Chocolate Cake, but this time it is round in shape, and doesn’t need a ganache glaze.
This recipe is one that I have used for wedding cakes, celebrations large and small and as you can see here below, for Halloween in a Mummy incarnation.
Believe or not the white mummy drapings are made from melted marshmallow! And many marshmallows are low FODMAP!
(Check out our Low FODMAP candy articles: one on candy itself and the other on specific ingredients).
What Are The 3 Ingredients?
The 3 featured ingredients are chocolate, eggs and butter. That’s it!
And like so many recipes that have few ingredients, it is imperative that each and every ingredient is the best that it can be. Buying fresh eggs is easy, as is finding high quality sweet (unsalted) butter.
Save this article
The chocolate might take a bit more attention. I recommend chocolate that is 50% to 60% cacao mass.
The only fat listed on the label should be cocoa butter – no cottonseed oil or oils of any type. It is fine if your chocolate contains vanilla and/or lecithin (even soy lecithin). This will give you the best flavor and texture in the finished cake.
Speaking of Texture
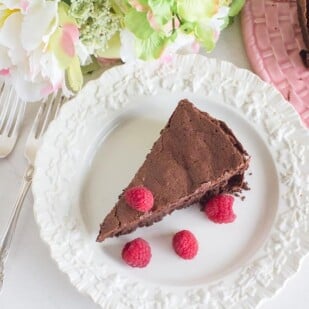
The texture of this finished cake is dense and rich – like a truffle chocolate candy. Whether you are following a low FODMAP diet or not, you truly only need a small slice. A little goes a long way.

The Mummy decoration is made from melted marshmallows! They can be stretched by hand to create mummy wrappings for a cute and Halloween holiday-appropriate look.

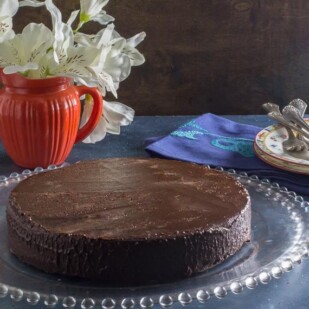
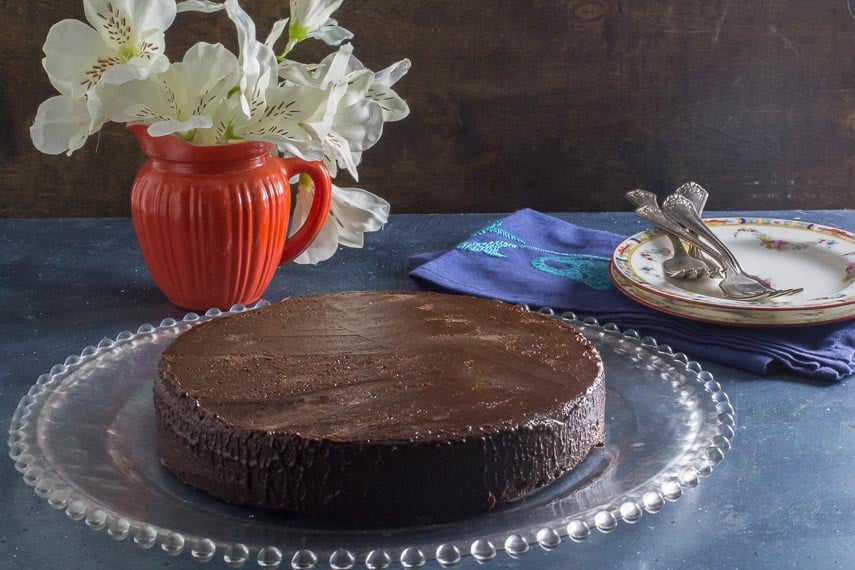
Low FODMAP 3-Ingredient Flourless Chocolate Cake
This recipe for Low FODMAP 3-Ingredient Flourless Chocolate Cake has a Halloween Mummy variation that we encourage you to try!
Low FODMAP Serving Size Info: Makes 1, 8-inch (20 cm) cake; 25 slices; 1 slice per serving
Ingredients:
Cake:
- 6 large eggs, at room temperature
- 1 pound (455 g) semisweet chocolate (50% to 60% cacao mass), finely chopped
- 1 cup (2 sticks; 226 g) unsalted butter, at room temperature, cut into pieces
Mummy Decoration (optional):
- 2 cups (4 ounces/115 g) miniature marshmallows
- 2 plastic “eyes”; I used “googly” eyes
Preparation:
-
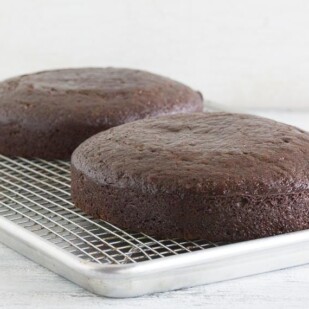
For the Cake: Preheat the oven to 375°F/190°C. Coat the inside of one 8-inch by 2-inch deep (20 cm x 5 cm) round cake pan with nonstick spray, line bottom with parchment, then spray parchment.
-
Place the whole eggs, in their shells, in a bowl filled with hot tap water for 5 minutes. Warming the eggs ensures maximum volume when they are whipped.
-
Place the chocolate and butter in a large heatproof bowl and set over a pot of simmering water or microwave until chocolate is three-quarters of the way melted. Remove from heat source and whisk gently every now and then for a few minutes until chocolate is completely melted and mixture is smooth.
-
Meanwhile, crack whole eggs into bowl and beat with mixer on high speed until tripled in volume, pale yellow and thick enough to hold a very soft peak.
-
Add about ¼ of the egg mixture to the cooled chocolate. Gently combine by hand, using a whisk. It’s OK if streaks of egg remain. Add remaining eggs and fold in, first using the whisk, then finishing with a large silicone spatula. The batter will deflate a bit, but try to retain as much volume as possible. The mixture will look like chocolate mousse. Scrape batter into pan and level with a small offset spatula.
-
Place the pan in a large roasting pan filled with 1-inch (2.5 cm) of hot water. Bake for about 12 to 15 minutes. The surface will look dull. If you tilt the pan slightly, the edges will come away from the sides of the pan. Both of those visuals are important and the only way to really tell that it is done. It will still be very soft, like a pudding. Don’t fret. Remove pan from water and cool pan completely on rack. Wrap with plastic wrap and refrigerate overnight. (Cake may be frozen at this point up to 1 week; defrost in refrigerator overnight before continuing).
-
For Unmolding: Unwrap pan, flip it over (the cake will not fall out) and allow hot tap water to run all over the bottom of the pan. The warmth from the water should loosen the cake from the sides and bottom of the pan. Warm an icing spatula under hot water and blot dry. Run the spatula around the sides of the cake. Apply pressure out towards the pan, not in towards the cake, or you might accidentally shave off some of the cake’s side. Flip the cake over and firmly shake and wiggle the pan back and forth; you are trying to get the cake to release its surface tension with the pan. The cake should slip out. If it doesn’t, repeat the warm water and jiggling steps. Gently lift off the pan completely. Peel off the parchment. Cake is ready to serve or decorate with Mummy “wrappings”, if desired.
-
For the Mummy Décor: Place mummy décor on cake within 4 hours of serving, for best results. Place marshmallows in a microwave safe bowl and heat on high for about 1 minute, check, and only microwave as long as it takes for the marshmallows to puff up a bit and are heated through. Remove from microwave and stir well to make sure all the little marshmallows are melted. Set aside for a few minutes until cool enough to handle. Meanwhile, set cake on serving platter.
-
Spritz your fingers and hands with nonstick spray. Carefully lift up a small amount of marshmallow with your fingertips (about 1 tablespoon’s worth) and using both hands, slowly stretch the marshmallow out into strands that are longer than the diameter of the cake and begin to drape around the cake, using the image for inspiration and guidance. The strings should go pretty much left to right, with some angles here and there, as shown, leaving a space for the eyes to peek out. This is gonna be sticky and messy. It helps if you have a helper holding scissors that you have spritzed with non-stick spray. They can cut the ends of the marshmallow strands as you stretch them and lay them on the cake. Simply press the ends of the marshmallow strands against the sides of the cake; they will stick. Place eyes as desired. Leave at room temperature and serve within 4 hours.
Notes:
Tips
- If you are making the Mummy version – GO FOR IT! It looks complicated in print, but as you are following along, with your fingers in the marshmallow, it will all make sense. Promise! You can do it!
Nutrition
All nutritional information is based on third-party calculations and should be considered estimates. Actual nutritional content will vary with brands used, measuring methods, portion sizes and more. For a more detailed explanation, please read our article Understanding The Nutrition Panel Within Our Recipes.


I’d love to make this – but I prefer cakes with a “bottom” (a cake-like base). Would you happen to have a recipe for such a thin cake base (gluten-free)?
Hi Gabi. I am not sure if you are asking if there is a GF cake batter that could be baked underneath this batter in the same pan? Or if you are looking for a cake-like cake to stack underneath this one in terms of a post-baking assembly and prior to serving? The former will not work. The issue with the latter is that while we do have cake-like cakes on the site, I would have no way to guide you in terms of FODMAP load once you combine a couple of recipes. This recipe was formulated to stand alone both in terms of taste, texture and FODMAPs, so perhaps looking at a different recipe might be the best thing.
Hi Dede,
I want to try this recipe, but I’m nervous about whether I’ll be able to correctly tell if it is done or not. I want to make sure the eggs are cooked to a safe temperature. What would you recommend? I’ve looked at other recipes and the internal temperature recommendations range anywhere from 140 to 200 degrees. That’s a huge range! Your thoughts?
I would buy pasteurized eggs if you are worried. And then follow directions. The cake MUST look very pudding-like and loose when it is “done”.
Ah, that’s a great idea! I will look into that, thank you!