
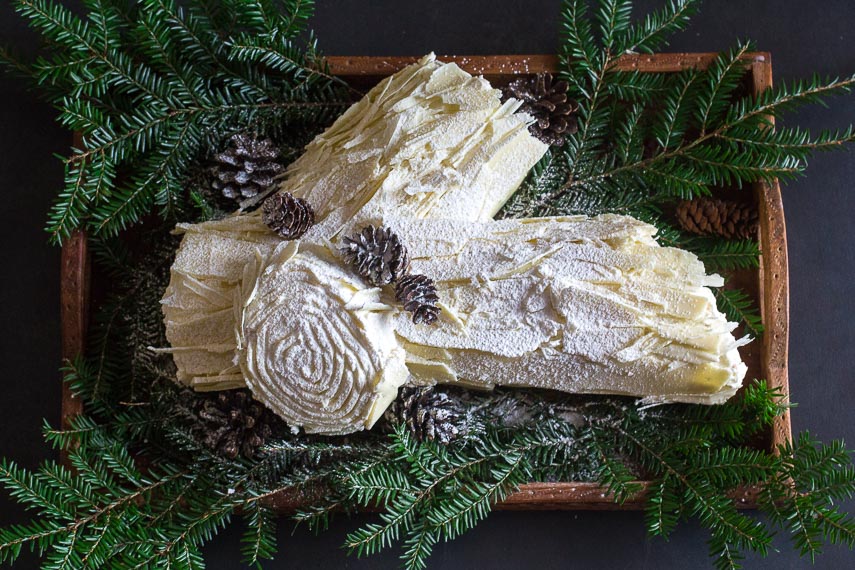
Our Low FODMAP White Chocolate Bûche de Noël features a yellow sponge cake, rolled around a cranberry and Swiss Meringue Buttercream filling, with a buttercream exterior and white chocolate “bark”. Confectioners’ sugar dusted on top looks like snow. All gluten-free, lactose-free and of course, low FODMAP.
What Is Bûche de Noël?
Bûche de Noël is the classic French dessert meant to look like a holiday yule log. The yule log was a specially chosen log burned in the fireplace on Christmas. Most traditional recipes for this fancy dessert use dark chocolate, so that the outside of the dessert evokes tree bark. We have a couple of those for you! One combines chestnut and chocolate, and another is based on ice cream and features chocolate and peppermint flavors – and the other is shaped like a stump. You definitely should go take a look!

What Is A White Christmas?
If you wake up Christmas morning, look out the window and see a blanket of sparkling white snow, then you’ve officially experienced your very own “white Christmas.” There is also the Irving Berlin song, White Christmas, which has been very popular since it was first heard in 1941.
So, while most traditional bûche de Noël feature dark chocolate, we went with a white Christmas theme.
Now, no matter where you live, whether there is snow or not, you can have a white Christmas!
How Do You Make A Gluten-Free Jelly-Roll Cake?
A “jelly-roll” cake is a light sponge cake, often with a jelly filling (but not always) rolled up into a spiral. When the cake is cut, you see the pretty spiraled filling. One very important feature of such a cake is flexibility. You need a cake that is substantial enough to hold its shape, so that its texture (and color) remain distinct from the chosen filling, but it also has to be flexible enough to roll without cracking.
And, in our case we wanted it to be gluten-free and lactose-free. Every ingredient called for, and the techniques used, in our cake recipe are important for great results, but I want to call your attention to the flour.
When Do You Use Cake Flour?
Cake flour is “softer” than all-purpose flour. What this means is that it has a lower protein content and will produce a more tender crumb. You would want to use cake flour in many cake recipes, but not in a bread recipe, for instance. Bread flour has an even higher protein content than all-purpose.
In the gluten-free world we have various flours and blends at our disposal that are also low FODMAP. As many of you know, I believe that Bob’s Red Mill 1 to 1 Gluten Free Flour Blend is hands-down the best substitute for conventional all-purpose flour in most recipes.
When I need a softer, tender crumb, in a recipe where I would normally use cake flour, I prefer King Arthur Flour Measure For Measure Flour. It has a much higher starch content than the Bob’s Red Mill and produces the softer result I am looking for. This is also why I do not think it is a good all-around substitute for all-purpose flour in conventional recipes.
Using The Right Flour, Correctly
For a deeper dive, read our article Choosing A Low FODMAP All-Purpose Flour.
This recipe will be its best texture if made with King Arthur Flour Measure For Measure Flour, measured correctly, of course. We suggest whisking first to aerate, then dip and sweep with accurate dry measuring cups.
Not all measuring implements are created equal. You can read more on that here.
Let’s Look At The Components
This Low FODMAP White Chocolate Bûche de Noël is made up of four components.
- Sponge Cake
- Cranberry Filling
- Swiss Meringue Buttercream
- White Chocolate “Bark”
“Just” four components! Now, if you are a seasoned baker, this will be immediately understandable and do-able. For others, it might look like a lot, so let’s break down what we can do ahead.
What Can I Make Ahead?
- The white chocolate bark can be made even a week ahead and the pieces can be stored in an airtight container in the fridge.
- Cranberry filling can be made up to 4 days ahead and stored in an airtight container in the fridge.
- The sponge cake can be made up to 2 days ahead of serving and stored at room temperature, wrapped well.
- Swiss Meringue Buttercream can be made ahead – WAY ahead – as in it could be frozen a month ahead and then what we call “reconstituted” but the process is such a pain in the butt that we think it should be made right when you need it. If you do want to make it way ahead, read our article on bringing buttercream back to life.
We think the entire, assembled cake is better made the day before serving anyway, so it has time to “set”. Or you can make it very early in the day of serving.
So, you can see that there is a lot of opportunity for make-ahead components. Plan according to your needs.
Is White Chocolate Low FODMAP?
You can have portions of dark, milk and white chocolate even during the Elimination Phase – and we have a deep dive into each kind of chocolate for you:
- All About Dark Chocolate & FODMAPs
- All About Milk Chocolate & FODMAPs
- All About White Chocolate & FODMAPs
But to answer your question here, Monash University has lab tested white chocolate and a low FODMAP serving size is 25 g.
Please read the article linked above to understand how to buy a high-quality white chocolate. The flavor of this recipe depends on it. You must read labels and use a white chocolate that uses cocoa butter as its only fat. No other fats or oils (like cottonseed oils, palm oil, etc.).
Read The Recipe; Understand The Recipe
Every recipe should be read, top to bottom, before you make it. Now, for recipes that have two steps and can be seen and understood just by perusing the ingredients, it might not be quite as important. But with a recipe such as this, with several components and potentially new-to-you techniques, it behooves you to read it through and understand the task at hand.
If you have any questions before you start, simply reach out to me via our Contact form. I am happy to help.
How Long Does It Take To Make This Recipe?
Great question. And it is hard to answer, because you can start and stop, make components ahead – or not, multi-task – or not, etc.
I have made Bûche de Noël before and know the drill. My timing will be different from yours. If Google would allow us, I would have put “A Long Time” or “As Long As It Takes” in the time-related areas. This cake is what I call a project dessert. You need time. You need to have baking skill. It should be fun and enjoyable and a creative outlet. Your timing may vary.
How To Make Our White Chocolate Bûche de Noël
For The White Chocolate Bark
Melt the chopped white chocolate in the top of a double boiler until smooth.

Spread melted white chocolate thinly on the flat back of a scrupulously clean half-sheet pan. Allow the chocolate to set and firm up, which can be hastened in the refrigerator. Making the “bark” is all about temperature. If the chocolate is too cold when you try to make the curls and shards, it will shatter. If it is too warm, it won’t hold its shape, so you will have to manipulate the temperature. The technique is the same.

Take a sharp metal bench scraper, place it at the edge of the chocolate and hold at a 45° angle and push away from you. The shapes will form and you will be able to tell right way whether the chocolate is too cold or too warm. Real bark is variable, so you are looking to create pieces that are the length of the bench scraper blade but of various thickness and level of “curl”. Use the photos as a guide. Store in an airtight container in the fridge until needed, up to a week.

For The Cranberry Filling
Combine cranberries, sugar and water in a non-reactive saucepan.
 Stir together and bring to a vigorous simmer over medium heat.
 Simmer until thickened, stirring occasionally, about 5 minutes.
 Cool. Filling is ready to use or may be refrigerated in an airtight container for up to 4 days. It will become very firm after refrigeration. Allow to come to room temperature and stir to loosen up before assembling cake.
For The Sponge Cake
Position rack in center of oven and preheat oven to 350°F (180°C). Line a rimmed half-sheet baking pan (approx. 18-inches by 13-inches; 46 cm by 33 cm) with parchment paper. Coat paper with nonstick spray and dust lightly with extra flour, tapping out excess.
Whisk 1 ¼ cups (181 g) flour, almost all the sugar (just save about a tablespoon aside, doing this by eye), baking powder and salt together in a small bowl to aerate and combine; set aside.
Whisk the egg yolks, oil, water and vanilla together in a separate bowl, then whisk in the flour mixture until smooth.

Whip Your Whites!
In the clean, grease-free bowl of a stand mixer fitted with wire whip attachment, whip egg whites and cream of tartar on medium-low speed until foamy, about 1 minute. Increase speed to medium-high and whip until soft peaks form and beat in reserved tablespoon of sugar. Do not overbeat. The peaks should be “just” firm, but not stiff.

Add a large scoopful of the whipped egg whites to the cake batter and begin to fold in to lighten the batter.
Save this article

Then add remaining whipped egg whites and finish folding together.

Scrape Batter Into The Pan
Scrape batter into prepared pan and smooth into an even layer with a large offset spatula. Tap pan on work surface to dislodge large air bubbles.

Bake for about 12 to 15 minutes. The cake should be light golden in color and will spring back when pressed lightly in center. Do not over-bake or it will lose some flexibility. A toothpick will test clean.
Assessing Doneness & Unmolding
 While cake is baking, dampen a clean linen towel with water. Lay linen towel on top of cake, then place cake rack on top of linen.

Invert carefully. You will now be looking at the bottom of the pan.

Lift pan up and away and then carefully peel away parchment paper.

Create Your “Roll”
Allow cake to cool for a few minutes until barely warm, then roll up, starting with one long side.
 Use the towel to help guide your rolling, but don’t roll the towel inside the spiral! Place cake, seam side down, on rack to cool completely. Cake is ready to fill or may be wrapped very well in plastic wrap and held at room temperature for about 24 hours.
Assemble Your Bûche de Noël
Have Swiss Meringue Buttercream soft, spreadable and ready to go. The cranberry filling should be room temperature. Have a flat platter ready that is large enough to hold the entire log, perhaps with a branch going off to the side.
Unroll the cake and spread the cranberry filling all over, leaving a ½-inch (12 mm) border along one long side.

Cover the cranberry filling with a thin layer of buttercream. It is okay if the two mix together a bit.
 Firmly roll up the log with the empty border on the far side.
 Place seam side down on work surface and use hands to give log a good squeeze and even it out if needed. Cut the ends so that they are neat and even. Cut off about a quarter of the log on the diagonal to create the “branch”. I like to use a long, serrated knife.

Cut off a short “stump” if you like, too, as I did for the photos.
Apply Buttercream
Place strips of parchment paper on your platter to protect it from buttercream. You will want to situate them in such a way that you will be able to pull them out from under the log after it is covered with buttercream. Place the main log down on the platter and cover it with buttercream, making long swipes with your icing spatula to evoke “bark” along the length of the log.

Frost the ends as well. Decide where you will attach the “branch”, nestle the diagonal side against the main log, then cover the branch with buttercream. Attach the “stump” as well, which I chose to do on the top, a tad off center. All cake surfaces should be covered with buttercream at this point. Use a fork to make “rings” on the cut edges of the log, as seen below.

Pull parchment strips out and away and discard. Use a small offset spatula to patch up any areas that need it with buttercream.
Time To Decorate!
Arrange the chocolate “bark” on the log. There is no wrong way. Just as every tree is different, and even parts of the same tree are different, just go for a bark effect. The cake can be held at this point overnight. Drape lightly with plastic wrap and refrigerate. Or, if you have a very cool basement or garage, you can use those areas too (but NOT if you have mice or critters!).
Cue “White Christmas” On Your Play List – Time To Serve!
Bring to room temperature before serving. Tuck pine boughs and pinecones here and there, if you like. Dust with confectioners’ sugar “snow” right before serving. Simply slice the logs crosswise to serve.

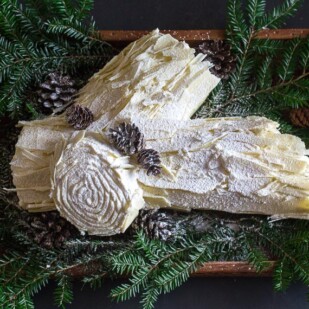
Here is a closeup for you to see our “snow” application.

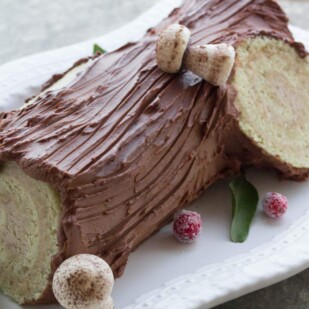
And if you are a dark chocolate and raspberry lover, we have another Buche just for you.
Low FODMAP White Chocolate Bûche de Noël
Our Low FODMAP White Chocolate Bûche de Noël features a yellow sponge cake, rolled around a cranberry and Swiss Meringue buttercream filling, with a buttercream exterior and white chocolate “bark”. Confectioners’ sugar dusted on top looks like snow. All gluten-free, lactose-free and of course, low FODMAP.
Ingredients:
White Chocolate Bark:
- 4- ounces (115 g) white chocolate, chopped finely, such as Callebaut, Valrhona Ivoire or El Rey Icoa
Cranberry Filling:
- 12- ounces (340 g) fresh or frozen cranberries
- 1 ½ cups (297 g) sugar
- 1/4 cups (60 ml) water
Cake:
- 1 ¼ cups (181 g) low FODMAP gluten-free flour, such as King Arthur Measure for Measure Flour; you want a soft, cake flour type flour for this recipe; plus extra
- ¾ cup (149 g) sugar, divided
- 1 ½ teaspoon baking powder; use gluten-free if following a gluten-free diet
- ¼ teaspoon salt
- 5 large eggs, at room temperature, separated
- ½ cup (120 ml) neutral flavored vegetable oil, such as rice bran or canola
- ¼ cup (60 ml) water, at room temperature
- 2 teaspoons vanilla extract
- ¼ teaspoon cream of tartar
Decoration:
- 1 batch Swiss Meringue Buttercream, soft and ready to use
- Pine boughs, optional
- Pinecones, optional
- Confectioners’ sugar
Preparation:
-
For the White Chocolate Bark: Melt the chopped white chocolate in the top of a double boiler until smooth. Spread melted white chocolate thinly on the flat back of a scrupulously clean half-sheet pan. Allow the chocolate to set and firm up, which can be hastened in the refrigerator. Making the “bark” is all about temperature. If the chocolate is too cold when you try to make the curls and shards, it will shatter. If it is too warm, it won’t hold its shape, so you will have to manipulate the temperature. The technique is the same. Take a sharp metal bench scraper, place it at the edge of the chocolate and hold at a 45° angle and push away from you. The shapes will form and you will be able to tell right way whether the chocolate is too cold or too warm. Real bark is variable, so you are looking to create pieces that are the length of the bench scraper blade but of various thickness and level of “curl”. Use the photos as a guide. Store in an airtight container in the fridge until needed, up to a week.
-
For the Cranberry Filling: Combine cranberries, sugar and water in a non-reactive saucepan, stir together and bring to a vigorous simmer over medium heat. Simmer until thickened, stirring occasionally, about 5 minutes. Cool. Filling is ready to use or may be refrigerated in an airtight container for up to 4 days. It will become very firm after refrigeration. Allow to come to room temperature and stir to loosen up before assembling cake.
-
For the Cake: Position rack in center of oven and preheat oven to 350°F (180°C). Line a rimmed half-sheet baking pan (approx. 18-inches by 13-inches; 46 cm by 33 cm) with parchment paper. Coat paper with nonstick spray and dust lightly with extra flour, tapping out excess.
-
Whisk 1 ¼ cups (181 g) flour, almost all the sugar (just save about a tablespoon aside, doing this by eye), baking powder and salt together in a small bowl to aerate and combine; set aside. Whisk the egg yolks, oil, water and vanilla together in a separate bowl, then whisk in the flour mixture until smooth.
-
In the clean, grease-free bowl of a stand mixer fitted with wire whip attachment, whip egg whites and cream of tartar on medium-low speed until foamy, about 1 minute. Increase speed to medium-high and whip until soft peaks form and beat in reserved tablespoon of sugar. Do not overbeat. The peaks should be “just” firm, but not stiff. Add a large scoopful of the whipped egg whites to the cake batter and begin to fold in to lighten the batter, then add remaining whipped egg whites and finish folding together. Scrape batter into prepared pan and smooth into an even layer with a large offset spatula. Tap pan on work surface to dislodge large air bubbles.
-
Bake for about 12 to 15 minutes. The cake should be light golden in color and will spring back when pressed lightly in center. Do not over-bake or it will lose some flexibility. A toothpick will test clean. While cake is baking, dampen a clean linen towel with water. Lay linen towel on top of cake, then place cake rack on top of linen. Invert carefully, lift pan up and away and then carefully peel away parchment paper. Allow cake to cool for a few minutes until barely warm, then roll up, starting with one long side. Use the towel to help guide your rolling, but don’t roll the towel inside the spiral! Place cake, seam side down, on rack to cool completely. Cake is ready to fill or may be wrapped very well in plastic wrap and held at room temperature for about 24 hours.
-
Assembly: Have Swiss Meringue Buttercream soft, spreadable and ready to go. The cranberry filling should be room temperature. Have a flat platter ready that is large enough to hold the entire log, perhaps with a branch going off to the side.
-
Unroll the cake and spread the cranberry filling all over, leaving a ½-inch (12 mm) border along one long side. Cover the cranberry filling with a thin layer of buttercream. It is okay if the two mix together a bit. Firmly roll up the log with the empty border on the far side. Place seam side down on work surface and use hands to give log a good squeeze and even it out if needed. Cut the ends so that they are neat and even. Cut off about a quarter of the log on the diagonal to create the “branch”. Cut off a short “stump” if you like, too, as I did for the photos.
-
Place strips of parchment paper on your platter to protect it from buttercream. You will want to situate them in such a way that you will be able to pull them out from under the log after it is covered with buttercream. Place the main log down on the platter and cover it with buttercream, making long swipes with your icing spatula to evoke “bark” along the length of the log. Frost the ends as well. Decide where you will attach the “branch”, nestle the diagonal side against the main log, then cover the branch with buttercream. Attach the “stump” as well, which I chose to do on the top, a tad off center. All cake surfaces should be covered with buttercream at this point. Use a fork to make “rings” on the cut edges of the log. Pull parchment strips out and away and discard. Use a small offset spatula to patch up any areas that need it with buttercream.
-
Arrange the chocolate “bark” on the log. There is no wrong way. Just as every tree is different, and even parts of the same tree are different, just go for a bark effect. The cake can be held at this point overnight. Drape lightly with plastic wrap and refrigerate. Or, if you have a very cool basement or garage, you can use those areas too (but NOT if you have mice or critters!).
-
Bring to room temperature before serving. Tuck pine boughs and pinecones here and there, if you like. Dust with confectioners’ sugar “snow” right before serving. Simply slice the logs crosswise to serve.
Notes:
Tips
FODMAP Information
Our recipes are based on Monash University and FODMAP Friendly science.
- Butter: Both Monash University and FODMAP Friendly have lab tested butter. Monash states that a low FODMAP Green Light portion is 1 tablespoon or 19 g and also states that “butter is high in fat and does not contain carbohydrates (FODMAPs)”. FODMAP Friendly gives it a “Pass” at 1 tablespoon or 19 g. Both recommended serving sizes are presented as part of healthy eating guidelines, not as maximum FODMAP serving size. Fat can affect guy motility and trigger IBS symptoms in some people. Eat to your tolerance.
- Chocolate: Monash University has lab tested dark, milk and white chocolate all have low FODMAP amounts: 85% dark at 20 g; dark at 30 g; milk at 20 g; white at 25 g.
- Cranberries: Both Monash University and FODMAP Friendly have lab tested cranberries. FODMAP Friendly has lab tested fresh cranberries and gives them a “Fail” at 40 g or ⅜ cup. On the Monash app you will find Dried Cranberries are given a Green Light low FODMAP serving of 1 Australian tablespoon, or 15 g. On the Monash website itself they discuss fresh cranberries and state that 130 grams fresh, which is about a scant 1 ¼ cups, should be tolerated well.
- Eggs: Eggs are high in protein and do not contain carbohydrates, according to Monash University.
- Oil: All pure oils are fats and contain no carbohydrates, therefore they contain no FODMAPs.
- Sugar: Monash University and FODMAP Friendly have both lab tested white, granulated sugar. Monash states that a Green Light low FODMAP serving size of white sugar is ¼ cup (50 g). FODMAP Friendly simply states that they have tested 1 tablespoon and that it is low FODMAP. Regular granulated white sugar is sucrose, which is a disaccharide made up of equal parts glucose and fructose. Sucrose is broken down and absorbed efficiently in the small intestine.
Please always refer to the Monash University & FODMAP Friendly smartphone apps for the most up-to-date lab tested information. As always, your tolerance is what counts; please eat accordingly. The ultimate goal of the low FODMAP diet is to eat as broadly as possible, without triggering symptoms, for the healthiest microbiome.
Nutrition
All nutritional information is based on third-party calculations and should be considered estimates. Actual nutritional content will vary with brands used, measuring methods, portion sizes and more. For a more detailed explanation, please read our article Understanding The Nutrition Panel Within Our Recipes.


My family loves it! Thank you for sharing this yummy recipe!
It is a showstopper for sure – and I always make sure they taste as great as they look!