Let’s Make Low FODMAP Lemon Meringue Cake!
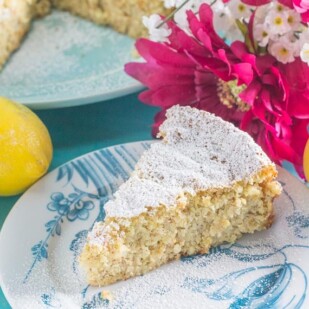
We love a lemon meringue pie; we love lemon curd in crisp, white meringue nests and nestled into buttery, cookie crusts as a tart– and we are crazy about this Low FODMAP Lemon Meringue Cake.

Plan Ahead, Then Assemble The Day Of
This recipe is all about assembly. The lemon curd must be made ahead and chilled thoroughly; I like to make it the day before – or several days before. Take advantage of this to make your life easier.
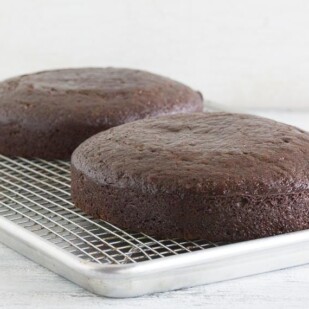
Then you will make a simple gluten-free yellow cake either the day before or early the day of serving. Again, take advantage of this flexibility.
Note that we are suggesting 6-inch (15 cm) round layers, which will give you the lovely dimension that you see in the images. You might not have 6-inch (15 cm) cake pans, so plan ahead. You will need two. PS: when buying cake pans, we always look for straight sides.
Then, a batch of meringue is made and you assemble all of the components the day of serving. The cake can sit for several hours before serving, but it should be within 6 hours.
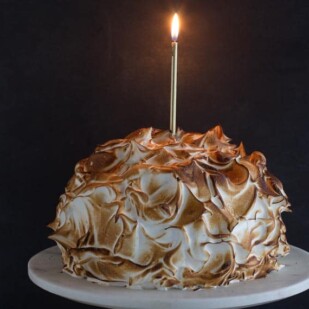
Then, you can serve as is, as shown above, or…

With a candle for a birthday celebration…(we like these ultra-elegant super long ones)
Save this article

Or go hog wild with a sparkler! We think this makes a smashing choice for Mother’s Day or Father’s Day, too.

If you are a lemon fan, try some of our savory recipes, too, such as our Moroccan Chicken with Preserved Lemons & Olives that is based on Preserved Lemons. Or how about our Lemon Pepper Risotto with Seared Scallops, Lemon Dill Swordfish Kebobs, or Chicken Thighs with Lemon Lime Herb Mojo.
Looking for more special cakes, for special occasions? Check out our article, 15 Low FODMAP & Gluten-Free Birthday Cakes & Celebratory Treats.
Low FODMAP Lemon Meringue Cake
Our Low FODMAP Lemon Meringue Cake is the perfect birthday or celebration cake! Lot's of do-ahead components, too.
Low FODMAP Serving Size Info: Makes 1, 6-inch (15 cm) domed cake; 10 servings
Ingredients:
Filling:
- 1 batch Lemon Curd, chilled and ready to use
Cake:
- 1 1/3 cups (193 g) low FODMAP gluten-free flour, such as Bob’s Red Mill 1 to 1 Gluten Free Baking Flour
- 1 1/4 teaspoons baking powder; use gluten-free if following a gluten-free diet
- ¼ teaspoon salt
- 1/2 cup (1 stick; 113 g) unsalted butter, at room temperature, cut into small pieces
- Heaping 3/4 cup (151 g) sugar
- 1 teaspoon vanilla extract
- 2 large eggs, at room temperature
- 1/2 cup (120 ml) lactose-free whole milk, at room temperature
Meringue:
- 1/3 cup (65 g) plus 2 tablespoons sugar, divided
- 2 tablespoons water
- 2 large egg whites, at room temperature
- 1/4 teaspoon cream of tartar
- 1/2 teaspoon vanilla extract
Preparation:
-
Make the Cake: Position the rack in the center of your oven. Preheat to 350˚F/180°C. Coat two 6-inch (15 cm) round cake pans with nonstick spray, line bottoms with parchment rounds, then spray parchment.
-
Whisk together flour, baking powder and salt in a medium bowl to combine and aerate; set aside.
-
In a large bowl with an electric mixer on medium-high speed, beat butter until creamy, about 2 minutes. Add the sugar gradually and beat until very light and fluffy, about 3 minutes, scraping down the bowl once or twice. Beat in vanilla.
-
Beat in the eggs one at a time, scraping down after each addition, allowing each egg to be absorbed before continuing. Add the flour mixture in four additions, alternating with the milk. Begin and end with the flour mixture and beat briefly until smooth. Divide batter evenly in pans.
-
Bake for about 18 to 22 minutes or until a toothpick inserted in the center shows a few moist crumbs. The cake will have begun to come away from the sides of the pan. Cool on rack for 10 minutes. Unmold onto a rack, peel off parchment and cool completely. The cake is now ready to assemble or alternatively, wrap layers in plastic wrap, store at room temperature and assemble within 24 hours.
-
For Meringue and Assembly: Have lemon curd chilled and cake layers cooled and ready to use.
-
For the meringue, place ⅓ cup (65 g) of sugar and the water in a small saucepan. Stir to wet sugar. Attach a candy thermometer to the pan with the tip suspended in the middle of the liquid (visual cues given below as well). Bring to a boil over medium-high heat, swirling pan occasionally. Dip pastry brush in cold water and wash down sugar crystals from the sides of the pot once or twice. Allow sugar mixture to simmer gently as you proceed with egg whites.
-
Meanwhile, place egg whites in a clean, grease-free mixing bowl and whip until frothy on low speed with an electric mixer. Add cream of tartar and turn speed to medium-high and keep beating. When soft peaks form, add the 2 tablespoons of sugar gradually. Continue whipping until stiff, glossy peaks form.
-
Bring the sugar/water mixture to a rapid boil and cook until it reaches 248˚ to 250˚ F/120°C to 121°C. As syrup cooks, check visual cues to assess doneness if you do not have a thermometer: it starts out with a thin consistency and many small bubbles covering the entire surface. As the water evaporates, the mixture will become visibly thicker. Bubbles become larger and pop open more slowly. At this point the syrup definitely looks thickened, but it has not begun to color; this is the firm ball stage - if you drop a bit of the syrup into a glass of cold water it will form into a ball. When you squeeze the ball between your fingertips, it will feel firm and the syrup is ready.
-
Slowly pour syrup in a thin, steady stream directly over the meringue with one hand while you move the beaters around with the other. Take care not to pour any syrup on the beaters or the sides of the bowl.
-
Whip meringue until cool to the touch; this could take several minutes. Beat in vanilla.
-
Cut each cake layer horizontally into two even layers. Place one cake layer on your serving plate, cut side up. Place a generous amount of lemon curd on top and spread all the way to the sides, trying not to let it drip beyond the edges; it should be firm enough that this will not be a problem. Place second cake layer on top, pressing gently to adhere, then more lemon curd followed by third cake layer, more lemon curd and finally put last cake layer on top.
-
Take cooled meringue and place a very generous amount on top of the cake. Use an icing spatula or a spoon to spread the meringue all over the top of the cake. Coat the sides of the cake generously as well. You want a thick coat of meringue all around. Use the spatula or a spoon to create peaks here and there (use image for inspiration). Cake may stand at cool room temperature for up to 6 hours.
-
Right before serving, use a propane or butane torch to brown the meringue and be impressed with your work! Cake is ready to serve.
Notes:
Tips
- Whenever making meringue make sure your bowl, beaters - anything that the egg whites come in contact with - are scrupulously clean. Any grease or fat at all will retard their ability to reach maximum volume.
Nutrition
All nutritional information is based on third-party calculations and should be considered estimates. Actual nutritional content will vary with brands used, measuring methods, portion sizes and more. For a more detailed explanation, please read our article Understanding The Nutrition Panel Within Our Recipes.