
Our super smooth and creamy New York style low FODMAP cheesecake features real dairy – lactose-free cream cheese and sour cream. The gluten-free, low FODMAP crisp graham-cracker crust makes this a new IBS-friendly classic! We give you options for various toppings, too. Like Strawberry Glazed!

How Do You Make A Low FODMAP Cheesecake?
In my effort to bring you classic desserts re-formulated to be low FODMAP, I am pleased to present a classic New York-style cheesecake, based on rich and smooth lactose-free cream cheese with the addition of tangy lactose-free sour cream. We offer you a few variations: plain, with lemon curd – and with juicy glazed strawberries.
Bet you thought a New York Style Low FODMAP Cheesecake was impossible. NOPE! And this one is so creamy, so delicious, that even non-FODMAPers will swoon.

Crumb Crusts
Feel free to use whatever low FODMAP cookies you like to make the crust, although I think a fairly neutral flavored cookie is best, such as a shortbread or graham cracker. You can find many low FODMAP cookies – read labels, of course, and also refer to our Shopping Lists.
I like to grind the cookies to a fine texture in a food processor fitted with a metal blade, pulsing on and off to start. Alternatively, you can place your chosen cookies in a heavy zip top bag and crush them with a rolling pin. Just make sure that they are finely and evenly crushed.
The amount of melted butter needed to create a crumb crust that sticks together well will depend on the cookie itself, so if you need a little more or a little less, just go with it.
Shopping For Low FODMAP Foods
Did you know that we have Shopping Lists? They have been compiled by our Monash University trained Success Team RD Vanessa Cobarrubia and they list THOUSANDS of low FODMAP products for you to shop for, including cookies.
These Nairn’s Gluten Free Oat Grahams have been given the green light by Vanessa and they are perfect for cheesecake – or anytime you need a graham cracker style crust.
By the way, the 1 ¼ cup of fine crumbs that you need can be made with one 5.64 ounce (160 g) box of the Nairn’s. And, if you use the Nairn’s, which I hope you do, you should use 6 tablespoons (85 g) of melted unsalted butter.

Lactose-Free Cream Cheese
We are so very happy that we have lactose-free cream cheese available to us; Green Valley Creamery Brand cream cheese was used in developing and testing this recipe.
This brand and item is not available for everyone, but if you can get it, and are a cheesecake fan, this recipe for NY-Style Low FODMAP Cheesecake will thrill you.
This lactose-free cream cheese is a fabulous product, and we love it schmeared on English Muffins, in Cream Cheese Frosting, and in cheesecakes, such as this recipe, and in our Cream Cheese Brownies, Cheesecake Pie as well as our Lime Cheesecake Dip, Pumpkin Cheesecake and Chocolate Cheesecake.
Can I Substitute Another Cream Cheese?
You CANNOT substitute regular conventional cream cheese. They do not react the same to beating or baking. The ratios of the ingredients called for in this recipe are tested and work with the lactose-free cream cheese made by Green Valley Creamery.
If you want to try this recipe with another lactose-free cream cheese, you could try it, and I would love to hear from you about your experiences!
Use A Water-Bath for Best Results
Our cheesecake is baked in a water-bath, which insulates the cake from the oven heat. This provides a very gentle baking that helps promote a super creamy, smooth result.
To protect the cake from any water leaking into the pan, you could use extra-wide, heavy-duty aluminum foil wrapped around the outside of the pan, but there is an even better solution!
Silicone Water Bath Wrap
Here in this picture below you can see this pink silicone “pan”. It is essentially a pan shape piece of flexible silicone that is designed to act as a “wrap” or protective layer for your cheesecakes when they bake in a water bath.

I LOVE my Easy Bath Cheesecake Wrap. Yes, this is an item with basically one use, but it does its job very well. I own both the yellow 9-inch (23 cm) wrap and the pink 10-inch (25 cm) and find owning both to be useful. Some folks find the yellow 9-inch (23 cm) wrap to fit too tightly on their 9-inch (23 cm) pan. I chose to use the 10-inch (25 cm) wrap in the images here. In my other cheesecakes you can see the yellow one in action.
Plan Ahead When Baking A New York Style Low FODMAP Cheesecake
As with many cheesecakes, this one cuts best after an overnight sit in the refrigerator, so plan accordingly. NY style cheesecakes are rich with cream cheese and the cake must firm up in the fridge overnight for best texture.
Ingredients For NY-Style Low FODMAP Cheesecake

Let’s look at each ingredient:
Low FODMAP, GF Graham Crackers – We love the Nairn’s and find that they are the best choice available to us in that they are the most similar to traditional graham crackers.
Butter – As is usual, we call for unsalted butter.
Lactose-Free Cream Cheese – This recipe was developed and tested (and THOROUGHLY enjoyed) with Green Valley Creamery Lactose-Free Cream Cheese. I cannot vouch for how this recipe will work with other cream cheese, as this product has some very unusual properties. But if you follow my directions, and use the ingredients called for, you will be rewarded with creamy lusciousness.
Sugar – Regular granulated sugar for this recipe. Pantry staple – and low FODMAP.
Vanilla Extract – We prefer pure vanilla extract over imitation.
Lactose-Free Sour Cream –I used Green Valley Creamery Lactose-Free Sour Cream for this recipe, but you can use any lactose-free sour cream.
Large Eggs – Make sure they are large (not extra-large), bring to room temperature and beat well in a bowl before adding to batter.
How To Make New York Style Low FODMAP Cheesecake
Let’s take this step-by step:
Prep Your Pan: You will need a 9-inch (23 cm) springform pan. Just give it a spritz of nonstick spray.
Make The Crumb Crust: Combine your very finely ground cookie crumbs with melted butter and press into the pan. I like to use a flat bottom measuring cup to help press in an even layer, as seen below.

Bake Crust Till Crisp: The oven starts hot to properly par-bake the crumb crust. Make sure that it is dry and crispy and light golden brown as seen below, before you pour in the batter. This will ensure a crisp crust when all is done.

Follow Instructions For Making Batter: Lactose-free cream cheese does not act like regular cream cheese. It liquifies very easily, so I like to combine a small portion of the cream cheese with the sugar and vanilla before adding the rest. It will be liquidy at this stage, which is OK.

Temperature of ingredients is important – and specific directions, such as that you should have the eggs beaten well before they are added to the batter (see more info below).
How To Tell If Cheesecake Is Done
You will see that in the recipe I have given you times but also visual cues. Pay close attention to the visual cues. The cheesecake should be a little more set around the edges but still a bit jiggly in the center. It will firm up tremendously upon chilling. Cheesecake is essentially a custard and should not been overbooked (which will also lead to cracking).
Cool & Chill: Once your cheesecake has cooled, refrigerate overnight for best texture. Then you are ready to serve or, check out our optional toppings, below.
Optional Toppings
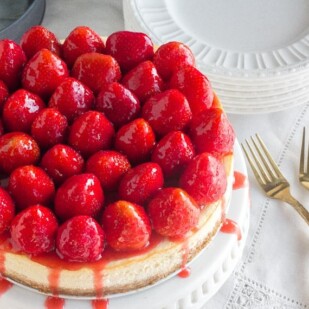
We provide you with some options for topping. This cheesecake is so rich and creamy with cream cheese and sour cream, which contrasts so nicely with the crisp crust, that it truly does not need any embellishment. But…those strawberries!
Save this article

How To Make The Glazed Strawberry Topping
If you would like to top it with Glazed Strawberries, I have a few notes for you. You will need approximately 1-pound (455 g) of berries to place on top, but, you need the most perfect, evenly sized berries, which means unless you are picking and choosing each berry at the market (highly unlikely), then you need to buy more than you need. I suggest buying at least 2-pounds (910 g) total (I often buy 3-pounds/1.4 kg). You will have a bunch leftover for other delicious dishes, like our Roasted Strawberries – or just snacking!

To start, choose the best-looking berries to place on top of the cheesecake (see below). The more uniform in size and shape the better. You will have leftover berries, but since strawberries have no FODMAPs, they are great for fruit salads, snacking or any other way you can think of incorporating them into your diet.

Once you have placed the best berries on top, you will chop 1/2-pound (225 g) of them, combine them with sugar and place them in a non-reactive saucepan.
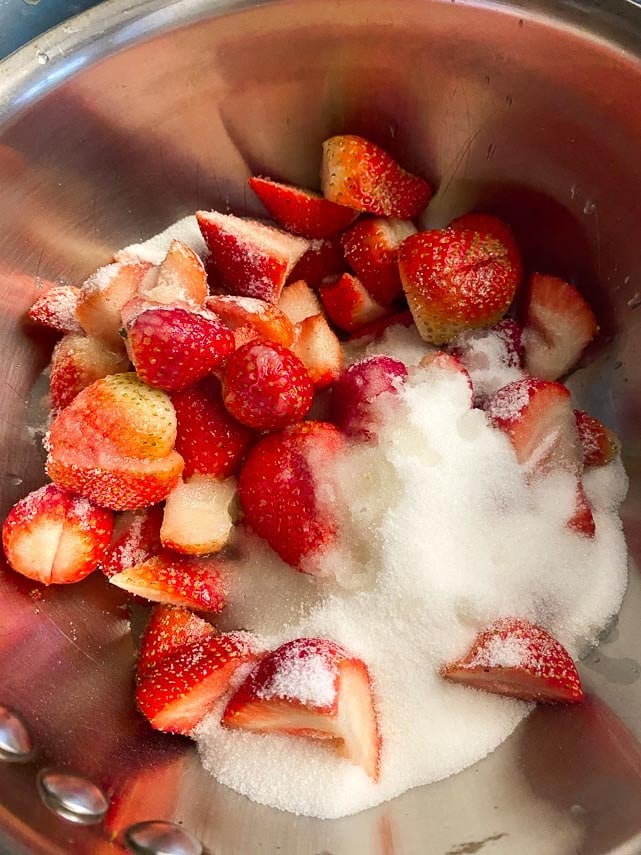
Next step is to cook them down until they form a thickened sauce. I like to use a potato masher to help break down the berries:

A cornstarch slurry (combined cornstarch and water) is stirred into the crushed berries, which you then cook a little more until thick and glossy:

Have a fine-meshed strainer ready over a bowl, pour the chunky strawberry sauce in the strainer and press not through using a silicone spatula to make the smooth, clear glaze as seen below:
 Now your glaze is ready to be brushed and spooned on top of your ready–and-waiting berries!
How To Prevent Cheesecakes From Cracking
Sometimes cheesecakes crack. Happens to the best of us. And they taste just as good! But, if you want to prevent cracks, there are a few things to pay attention to:
-
- Temperature of Ingredients: Our recipe calls for room temperature ingredients. This relates to cracking because room temperature ingredients will blend together more readily, which in turn means you do not have to aggressively beat the batter to blend, which in turn means less air bubbles will be produced. If you bake a very airy cheesecake batter, it is more prone to rising, falling and cracking.
- Beating Technique: As just described, you do not want to beat air into the batter. Cream the ingredients together just until blended.
- Beat Your Eggs BEFORE Adding: If you beat your eggs before adding to the batter, then you do not have to beat the batter as much, which keeps it creamier and less aerated (see above).
- Water Bath: Baking cheesecakes in a water bath bakes the cake slowly and evenly, which can prevent cracking.
- Silicone Wrap: The problem with water baths is that water can seep into the springform pan and dampen the crust. Silicone wraps solve that problem.
- Do Not Overbake: Follow the visual cues in the recipe for success. The center should still be a bit jiggly.
- Use The Right Tools: When the cheesecake emerges from the oven, run a small, thin icing spatula around the edges of the cake, loosening it from the pan. As the cake cools and contracts, it will not try to pull away from the pan, which can lead to cracks.
- If All Else Fails: If your cheesecake does crack, don’t worry! Simply top it with fruit or bring slices to the table.
How To Unmold Cheesecake Perfectly In 1.5 Steps!
Once your cheesecake is done, you need to get it out of the springform pan. I actually have a lot to say about this. There are two main issues:
-
- How to remove the outer ring of the springform pan without ruining the sides of the cheesecake.

This one is easy. I recommend the use of a small, straight icing spatula (see above). Rinse it in warm water, then run it around the edge of the cheesecake to loosen it from the pan. Here is the trick: press the icing spatula outwards, against the pan. If you press inwards towards the cake, it will shave off edges of the cake. By pressing outwards, you will not only loosen it from the sides of the pan, but you will preserve the pretty, creamy edge of the cheesecake.
-
- How to remove the cheesecake from the not-so-glamorous bottom metal round.
Did that #2 get your attention? Perhaps you have never considered removing a cheesecake from its metal pan? You will see in these pictures (see below) that I formed the graham cracker crust directly on the bottom metal part of the springform pan.
 This isn’t a big problem logistically, but it is not very attractive, and, if you take the cake to a friend’s house, you are very likely to leave the pan bottom behind. I cannot even count the number of pan bottoms I have lost this way.
It’s All In The Pan Prep
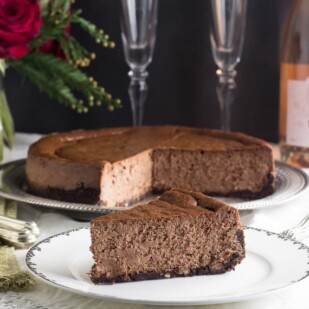
There is a way to prep the pan so that you can remove the cheesecake from the pan bottom. You can see this in action in our Low FODMAP Chocolate Cheesecake and our Frozen Low FODMAP Peanut Butter Cheesecake. See the image below, too. See how easily the cooled cheesecake is lifting away from the parchment lined springform pan bottom? Then you can place the cheesecake on any decorative plate that you like!

In order to do this, you generously cover the metal springform pan bottom with parchment paper BEFORE you snap on the springform ring. A spritz of nonstick spray, and then you press your crumb crust on there. Check out those other cheesecake recipes linked above to see many more images to help you.
How To Cut & Serve New York Style Low FODMAP Cheesecake
As mentioned above, NY style cheesecakes are rich with cream cheese and they are also pulled from the oven when the center is still a bit wiggly. They MUST be chilled overnight for best texture, which will be rich and creamy, but firm enough to slice.
But there are ways to cut your cheesecake that are better than others so that you end up with nice, clean wedges.
I recommend a long, thin-bladed slicing knife, although you can use a chef’s knife. Either way, let hot water run on the blade and then shake dry. Use the knife to make a cut, then wipe clean and repeat.
You may have heard that dental floss can be used to cut cheesecake. It does not work that well with this cheesecake.
TA DA! You are going to be making the best low FODMAP, lactose-free, gluten-free cheesecake, EVER! Even non-FODMAPers are going to LOVE this recipe.
Please note that the nutritional information includes the strawberry topping.
New York Style Low FODMAP Cheesecake
Our super smooth and creamy New York style cheesecake features real dairy – lactose-free cream cheese and sour cream. The gluten-free, low FODMAP crisp graham-cracker crust makes this a new IBS-friendly classic! We give you options for various toppings, too. Like Strawberry Glazed!
Low FODMAP Serving Size Info: Makes 1, 9-inch (23 cm) cheesecake; 24 slices; serving size 1 slice
Ingredients:
Crust:
- 1¼ cups (about 6-ounces/170 g) very fine low FODMAP cookie crumbs, such as shortbread or graham crackers like Nairn's; use gluten-free, if following a gluten-free diet
- 1 to 6 tablespoons (1 tablespoon to 85 g) unsalted butter, melted
Filling:
- 4 -8- ounce (227 g each) containers lactose-free cream cheese, such as Green Valley Creamery, at room temperature
- ¾ cup (149 g) sugar
- 1 teaspoon freshly squeezed lemon juice
- 1 1/4 teaspoons pure vanilla extract
- 5 large eggs, at room temperature, well beaten
- 1 cup (227 g) lactose-free sour cream, such as Green Valley Creamery, at room temperature
Optional Toppings:
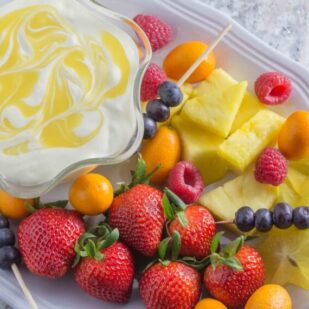
- 1 ½ cups (360 ml) Lemon Curd, prepared but not yet refrigerated
- Or
- 2- pounds (910 g) strawberries, preferably small to medium sized and deep red in color; you might not need them all
- ¼ cup (50 g) sugar
- 1 tablespoon freshly squeezed lemon juice
- 1 tablespoon cold water
- 1½ teaspoons cornstarch
Preparation:
-
For the Crust: Position a rack in the center of the oven. Preheat the oven to 375°F (190°C). Coat the inside of a 9-inch (23 cm) springform pan with nonstick spray. If you have the silicone wrap, place the metal springform pan inside it now. If you do not, then proceed as follows: double wrap the outside of the pan with 18-inch (46 cm)-wide aluminum foil, bringing the foil up and around the sides of the pan all the way to the top edge. Make sure the bottom edge of the pan is completely sealed off to protect it from the water-bath it will be placed in; set pan aside.
-
Place the cookie crumbs in a medium-size mixing bowl and stir in just enough melted butter to moisten the crumbs so that they stick together when pressed against the sides of the bowl. The amount of butter will vary hugely, depending on the type of cookie used. Press the crust mixture firmly into an even layer in the prepared pan.
-
Bake for 8 to 10 minutes, or until light golden brown. You want the crust to dry out a bit; you can touch it to assess. Remove the crust from the oven and set aside on a wire rack. Lower the oven temperature to 325°F (165°C).
-
For the Cheesecake: Place one 8-ounce (225 g) container’s worth of the cream cheese in a large mixing bowl and blend, with an electric mixer on low speed, until creamy and smooth, which will happen very quickly. Do not overbeat or let it get too liquidy. Add the sugar, lemon juice, and vanilla and blend very briefly on low speed. Pour in the beaten eggs a little bit at a time, mixing just enough to incorporate. Do not whip on high speed; you do not want to incorporate air. The mixture might be very thin at this point; that’s okay. Add the remaining three containers’ worth of cream cheese and sour cream and beat just until combined and smooth, maybe 30 seconds to 1 minute. If the mixture is not blending, use a large balloon whisk to whisk by hand to bring the cheesecake batter together. Scrape the filling into the crust and smooth the top with a small offset spatula. Place the silicone wrapped or foil-wrapped pan in a large roasting pan. Add very hot tap water to the roasting pan to come up the sides of the wrapped pan by about 1-inch (2.5 cm).
-
Bake for 1 hour. The cake should be set along the edges and slightly jiggly in the center. Turn off the oven and leave the cake in the oven for 20 minutes more. While the cake is still on its oven rack, dip the tip of a small paring knife in warm water and use it to run around the top edge of the cake (going down about ½ inch/12 mm) to loosen it from the pan; this will prevent the sides from pulling away from the pan as it cools, which can create cracks, then remove the cake from the oven. Remove the springform pan from the roasting pan and carefully remove the silicone wrap or foil. (If you are going to use the Lemon Curd option, pause at this point and read the directions further below). Cool to room temperature, then cover the top of the cake with plastic wrap and refrigerate the cake in the springform pan overnight or up to 48 hours. Dip a small icing spatula in warm water, shake dry, and run all the way around the outer edge of the cake, going all the way down to the bottom. Release the springform rim, remove it, and place the cake on a display plate. Your NY-Style Low FODMAP Cheesecake is ready to serve and is best served cold and sliced with a very thin-bladed knife, wiped cream between cuts. Dip the knife in warm water to facilitate the process.
-
Optional Toppings:
-
Lemon Curd Cheesecake: Simply pour the fluid lemon curd on top of the cheesecake very gently. Take care not to disturb the cheesecake surface. Use a small offset spatula to smooth it out into an even layer, then refrigerate cheesecake as described, at least overnight.
-
Glazed Strawberry Version: Wash and dry the berries, then hull them. Arrange the best-looking berries, cut side down, all over the top of the cake. Measure out ½-pound (225 g; reserve the rest for another use), finely chop and place them, along with the sugar and lemon juice, in a non-reactive saucepan and stir to combine.
-
Cook over medium heat, crushing the berries with a potato masher or fork, until they become juicy and break down into a thick sauce, for about 3 minutes. Meanwhile, combine the cold water and cornstarch in a small bowl and stir into the sauce. Continue to cook, stirring frequently, until the sauce thickens, for about 1 minute. Scrape into a fine-mesh strainer set over a bowl and press the sauce through the strainer, using a silicone spatula. Use a pastry brush and/or small spoon to coat the berries on the cake with the strained sauce. If the sauce thickens too much simply thin with a little bit of warm water. The cake is ready to serve, or may be refrigerated until serving time, preferably within the day. The cheesecake is best served cold the day it is assembled with the topping.
Notes:
Tips
- NY Style Cheesecake, by its very definition, is rich. And filled with dairy. The Low FODMAP diet is not a dairy-free diet, but it is lower in lactose and this recipe features lactose-free cream cheese and sour cream. That said, if you are sensitive to lactose, be prudent and follow your tolerances.
FODMAP Information
Our recipes are based on Monash University and FODMAP Friendly science.
- Strawberries: This popular berry has been lab tested by both Monash University and FODMAP Friendly. Monash lab testing reports that no FODMAPs were detected in strawberries. They suggest 10 medium berries (150 g) as a serving. FODMAP Friendly gives strawberries a “pass” and pegs 10 medium berries at (140 g).
- Sugar: Monash University and FODMAP Friendly have both lab tested white, granulated sugar. Monash states that a Green Light low FODMAP serving size of white sugar is ¼ cup (50 g). FODMAP Friendly simply states that they have tested 1 tablespoon and that it is low FODMAP. Regular granulated white sugar is sucrose, which is a disaccharide made up of equal parts glucose and fructose. Sucrose is broken down and absorbed efficiently in the small intestine.
Please always refer to the Monash University & FODMAP Friendly smartphone apps for the most up-to-date lab tested information. As always, your tolerance is what counts; please eat accordingly. The ultimate goal of the low FODMAP diet is to eat as broadly as possible, without triggering symptoms, for the healthiest microbiome.
Nutrition
All nutritional information is based on third-party calculations and should be considered estimates. Actual nutritional content will vary with brands used, measuring methods, portion sizes and more. For a more detailed explanation, please read our article Understanding The Nutrition Panel Within Our Recipes.
Other Recipes Featuring Lactose-Free Cream Cheese:
- Pumpkin Cheesecake
- Viennese Farmer Cheese Cake
- Chocolate Cheesecake
- Peanut Butter Cheesecake
- Ben Lee’s Butter Chicken
- Cream Cheese Brownies
- Cheesecake Pie
- PB&J Cream Cheese Brownies
- Cream Cheese Frosting
- Blue Cheese & Cheddar Cheese Ball
- Cranberry Raspberry Cheesecake Trifle
- Lime Cheesecake Dip with Fresh Fruit
- Scrambled Eggs with Smoked Salmon & Cream Cheese
- Rhubarb Cheesecake Tart
- Blue Cheese Dip
- …and more!


This was AMAZING ! I mis-read the amount of cream cheese needed and only had 2 packs on hand, so it was a baby cheesecake lol “less tall” – I simply halfed the ingredients and it came out soo good ! Will definitely keep this recipe on hand – thank you
Ahhh you are getting to enjoy one of my favorites! Thank your sharing your experience and ENJOY that insanely creamy dessert!
DÉDÉ, this is such a delicious dessert! Oh.my.goodness. I haven’t visited with my siblings and our families since March 2020 and I decided to make this spectacular cheesecake! I drove 40 minutes in order to get the Green Valley cream cheese and sour cream and I can tell you that the trip was worth it. This cheesecake is so creamy, so heavenly! My niece is lactose intolerant as am I and no one could believe that this cake was made with GF crust and with lactose free cheese! Wow. I am sold. I may have to make this my new go-to cheesecake recipe! Thank you!!!
Corinne, this made me SO happy! To hear the joy just warms my heart. The Green Valley folks really know what they are doing. High quality products – and once you realize the cream cheese “acts” a little different, a whole world opens up. Check out our cream cheese brownies, too, if you haven’t already.
Made this for yesterday for hubby’s birthday cake tonight. DELISH. SO creamy.
Followed the directions as listed for the cheesecake itself. The crust I went with using the only fodmap friendly cookie I could find in town, a soft snickerdoodle one that did not work, too mushy. But that was on me. Next time I’ll use the suggested oat graham cacher.
Thank you for letting us know your experience, which will help others. Now you know…in general you do want a crunchy crust to contrast with the creamy cheesecake. Guess you will have to make again:) Enjoy!
Absolutely fantastic recipe! Tastes wonderful and no difference from any other cheesecake. FYI, I used Bob’s Red Mill egg replacer instead of eggs, obviously, and it still came out great no issues at all. Thank you for this recipe.
Great to know about the egg replacer! That will be helpful for others. Thank you for letting us know.
Hi, I’m excited to try this recipe but would like to make it about a week in advance and freeze it. My concern is that the lactose free ingredients might not hold up well in the freezer.
Any experience or recommendations on this?
Hi there…you would be entering into unknown territory. I have not frozen this cake…but I would try! Obviously frozen plain with no topping.
Can this be made crustless? And in a regular pie pan?
I would use the cheesecake pie instead
What about using Neufchâtel cream cheese and dairy free sour cream? They are out of lactose free cream cheese everywhere!
The recipe is tried and true as presented. You could try the neufchâtel. The thing with the lactose-free cream cheese is that the technique used for beat it is specific to it…I would follow more conventional approaches to cheesecake making with the neufchâtel.